Set Screen (V1)
The Standalone SDK allows you to control the content displayed on connected display devices such as the MARK Display. You can use predefined screen templates to show information directly on the device — for example, to guide operators or display workflow data.
Each template defines a specific layout and set of text fields that can be customized at runtime.
How screen templates work
To display a screen on your MARK Display, call setScreen() from the PgManager.
This method uses a PgCommand containing a PgScreen instance that defines what and how to display. The PgScreen class includes the following parameters:
Parameter | Description |
|---|---|
| Instance of |
| Determines how the screen is updated on the MARK Display. Options are:
|
| Duration (in milliseconds) that the screen remains visible before automatically reverting to the previous view. Must be greater than 0. |
You can replace the current screen with a new one at any time. The durationMs value acts as an upper time limit rather than a strict timeout.
Handling command results
Define the IPgCommandResult interface to handle command success or failure:
onSuccess()– Called when the screen content was successfully updated.onError(error: PgError)– Called if the command fails (e.g., device not connected or unsupported).
Example:
PgManager.setScreen(
    PgCommand(
        commandData = PgScreen(
            screenView = PgScreenView.TemplateV1.PG1(
                templateField = PgTemplateField(
                    1,
                    "Header",
                    "Content",
                    "Header Right",
                )
            )
        )
    ),
    object : IPgCommandResult {
        override fun onSuccess() {
            // Handle successful template update
        }
        override fun onError(error: PgError) {
            // Handle error during template update
        }
    }
)
Template usage
Below are examples of predefined V1 screen templates available for MARK Display. Each template has specific field configurations and use cases.
Tip
Tip: Keep text fields short. Long titles or content that exceed the available space may be truncated or prevent the screen from rendering correctly.
Template | Code Sample (PgScreen) | Design |
|---|---|---|
PG1 | PgScreenView.TemplateV1.PG1(
templateField = PgTemplateField(
1,
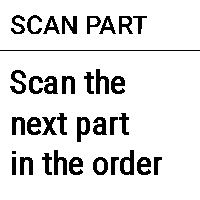
"Scan Part",
"Scan the next part in the order",
""
)
) |  |
PG1A | PgScreenView.TemplateV1.PG1A(
templateField = PgTemplateField(
1,
"",
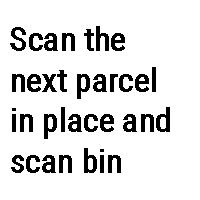
"Scan the next parcel in place and scan bin",
""
)
) |  |
PG1I | PgScreenView.TemplateV1.PG1I(
templateField = PgTemplateField(
fieldId = 1,
header = "",
content = "Confirm part",
headerRight = ""
)
) |  |
PG1C | PgScreenView.TemplateV1.PG1C(
templateField = PgTemplateField(
fieldId = 1,
header = "",
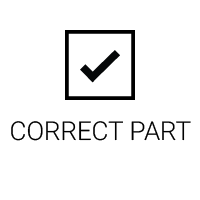
content = "Correct part",
headerRight = ""
)
) |  |
PG1E | PgScreenView.TemplateV1.PG1E(
templateField = PgTemplateField(
fieldId = 1,
header = "",
content = "Wrong part",
headerRight = ""
)
) |  |
PG2 | PgScreenView.TemplateV1.PG2(
templateFieldTop = PgTemplateField(
1,
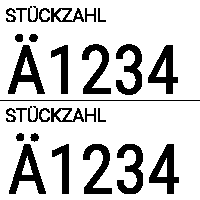
"STÜCKZAHL",
"Ä1234",
"",
),
templateFieldBottom = PgTemplateField(
fieldId = 2,
header = "STÜCKZAHL",
content = "Ä1234",
headerRight = "",
)
) |  |
PG2I | PgScreenView.TemplateV1.PG2I(
templateFieldTop = PgTemplateField(
1,
"",
"Title line",
"",
),
templateFieldBottom = PgTemplateField(
fieldId = 2,
header = "",
content = "More detailed info",
headerRight = "",
)
) |  |
PG2C | PgScreenView.TemplateV1.PG2C(
templateFieldTop = PgTemplateField(
1,
"",
"Title line",
"",
),
templateFieldBottom = PgTemplateField(
fieldId = 2,
header = "",
content = "More detailed info",
headerRight = "",
)
) |  |
PG2E | PgScreenView.TemplateV1.PG2E(
templateFieldTop = PgTemplateField(
1,
"",
"Title line",
"",
),
templateFieldBottom = PgTemplateField(
fieldId = 2,
header = "",
content = "More detailed info",
headerRight = "",
)
) |  |
PG3 | PgScreenView.TemplateV1.PG3(
templateFieldTop = PgTemplateField(
fieldId = 1,
header = "STÜCKZAHL",
content = "1234567ÜÄÖ",
headerRight = ""
),
templateFieldMiddle = PgTemplateField(
fieldId = 2,
header = "STÜCKZAHL",
content = "1234567ÜÄÖ",
headerRight = ""
),
templateFieldBottom = PgTemplateField(
fieldId = 3,
header = "STÜCKZAHL",
content = "1234567ÜÄÖ",
headerRight = ""
)
) | 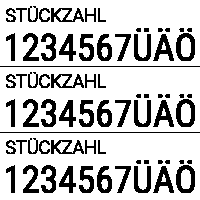 |
PG3A | PgScreenView.TemplateV1.PG3(
templateFieldTop = PgTemplateField(
fieldId = 1,
header = "XXXXXX",
content = "Field 1",
headerRight = "XXXXXX"
),
templateFieldMiddle = PgTemplateField(
fieldId = 2,
header = "XXXXXX",
content = "Field 2",
headerRight = "XXXXXX"
),
templateFieldBottom = PgTemplateField(
fieldId = 3,
header = "XXXXXX",
content = "Field 3",
headerRight = "XXXXXX"
)
) |  |