Integration settings
When creating a configuration, the Integration Path section allows you to select your preferred way of integrating Gateway Plus with your system, as well as configure several Gateway Plus connectivity options.
Integration Path
The Integration section allows you to select how the Gateway Plus will communicate with your system and transfer the barcode content scanner by the connected scanners.
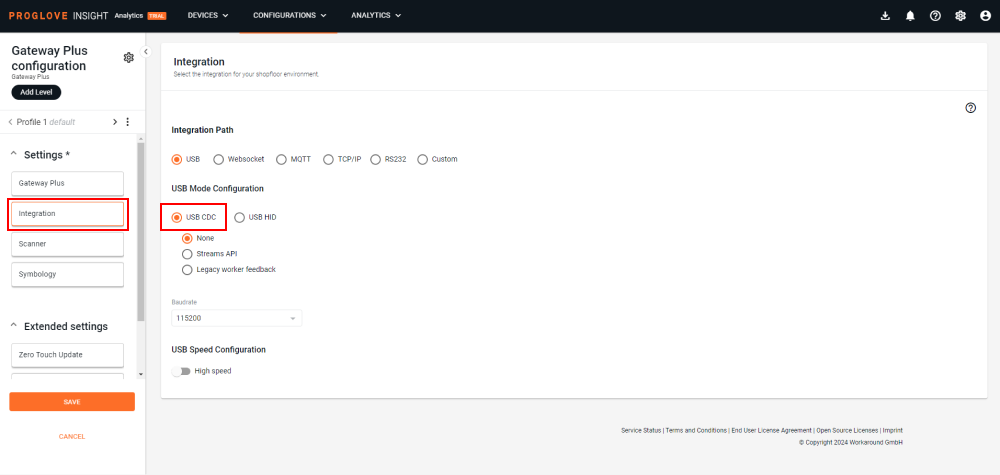
USB CDC
The USB CDC option allows you to transfer the barcode content through a virtual communication port (input as a string).
This path is set as default and will be selected as soon as you select USB as your Integration method.
For this integration path you can select:
Streams API - Select this option to enable communication using our Streams API, a two-way, message-based .JSON protocol based on the USB CDC integration path.
Legacy worker feedback - Select this option to enable sending messages to the connected scanners in order to notify workers about an event, and type in the number of seconds after which the feedback should time out.
Baudrate - The rate at which information is transferred in a communication channel.
USB speed configuration - Allows switching from Full speed, which is the default mode, to High speed.
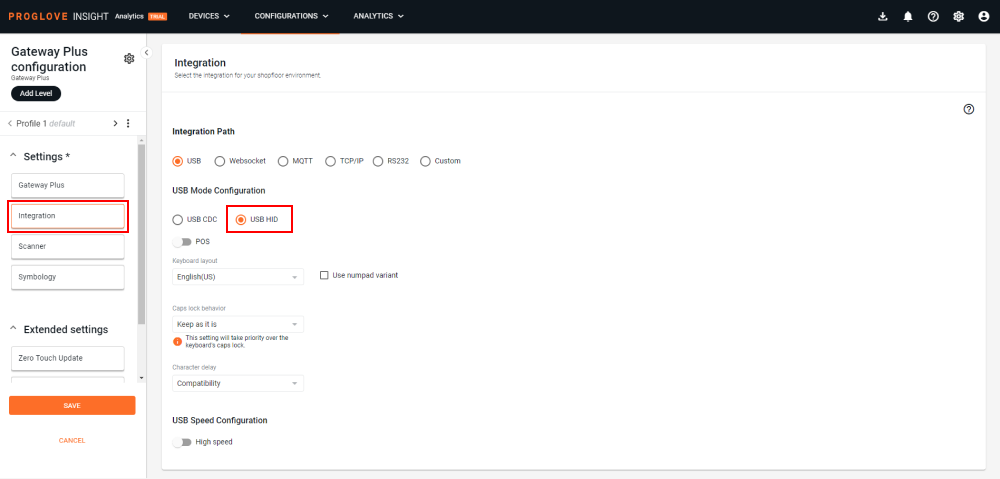
USB HID
The USB HID option allows you to transfer the barcode content as keyboard input to the connected host.
To select this path, select USB under Integration, and USB HID under USB Mode Configuration.
For the USB HID integration path you can enable or define:
POS - Point Of Sale support protocol for deep integration of barcode scanners into your application. When active, it will disable using different Keyboard Layouts which are available for standard USB HID integrations.
Keyboard Layout - Default language keyboard layout (e.g. English, German, Finnish, Czech, Dutch, Danish, Finnish etc.).
Use Numpad Variant - The numeric keypad is used for entering numbers.
Caps lock behavior - The way scanned content will be processed and sent to the INSIGHT webportal when Caps lock is enabled/disabled on the user's keyboard. There are four options available:
Keep as it is - Default value which does not modify the case of the characters in the scanned barcode.
Upper case - Character output is always in upper-case, regardless of the caps lock state on the user's keyboard.
Lower case - Character output is always in lower-case, regardless of the caps lock state on the user's keyboard.
Override caps lock - Character output will match the case of the scanned content, regardless of the caps lock state on the user's keyboard.
Character delay - Fast, Medium and Compatibility mode (when sending data, some apps need longer to input characters).
USB speed configuration - Allows switching from Full speed, which is the default mode, to High speed.
WebSocket
The WebSocket option allows you to transfer the barcode content using WebSockets by automatically creating an output Action in the Workflow rules.
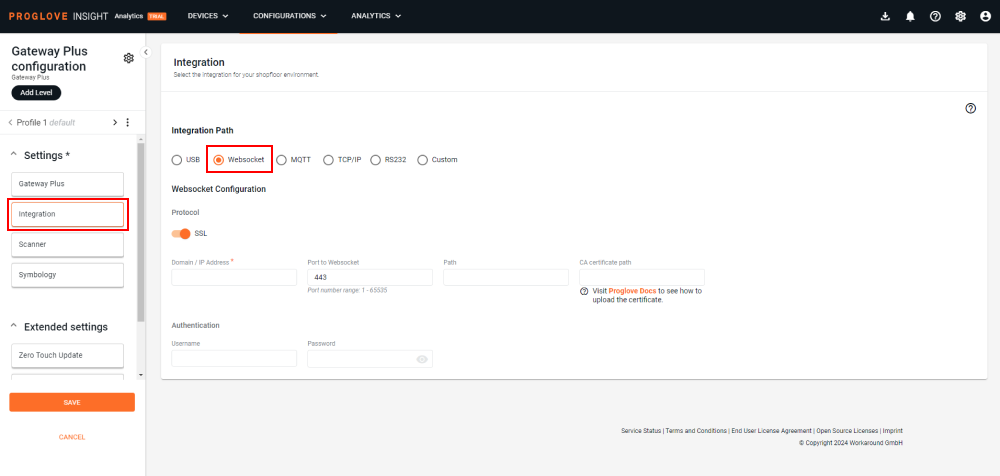
Important
The WebSocket and MQTT integration paths require you to provision the Gateway Plus with Wi-Fi network credentials and the WebSocket and MQTT configuration file. To learn more, see WebSocket configuration or MQTT configuration.
MQTT
The MQTT option allows you to transfer the barcode content using MQTT by automatically creating an output Action in the Workflow rules.
It also allows using the serial numbers of your scanners and your Gateway Plus device as a wildcard in the device configuration. Instead of the individual Client ID settings per Gateway Plus, this enhancement simplifies the setup process. Simply check off the box and send the data to INSIGHT automatically.
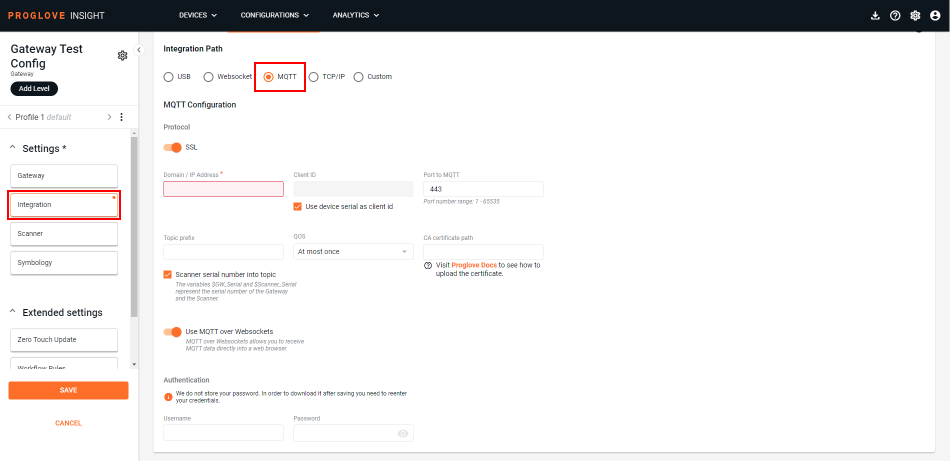
The supported MQTT broker version is version 3.1.1. Listed below are the defaults for connection parameters:
keep alive: 1200s
reconnection min delay: 1s
reconnection max delay: 120s
Important
The WebSocket and MQTT integration path requires you to provision the Gateway Plus with Wi-Fi network credentials and the WebSocket or MQTT configuration file. To learn more, see WebSocket configuration or MQTT configuration.
TCP/IP
Transmission Control Protocol/Internet Protocol or TCP/IP is a communication protocol that allows you to connect devices within your private network. Use it to integrate with ProGlove when there are multiple Gateway Plus devices, with a single configuration, using the same network. You can select whether you want your Gateway Plus to act as a Client or a Server, and simply enter the IP address and the Port number for your network.

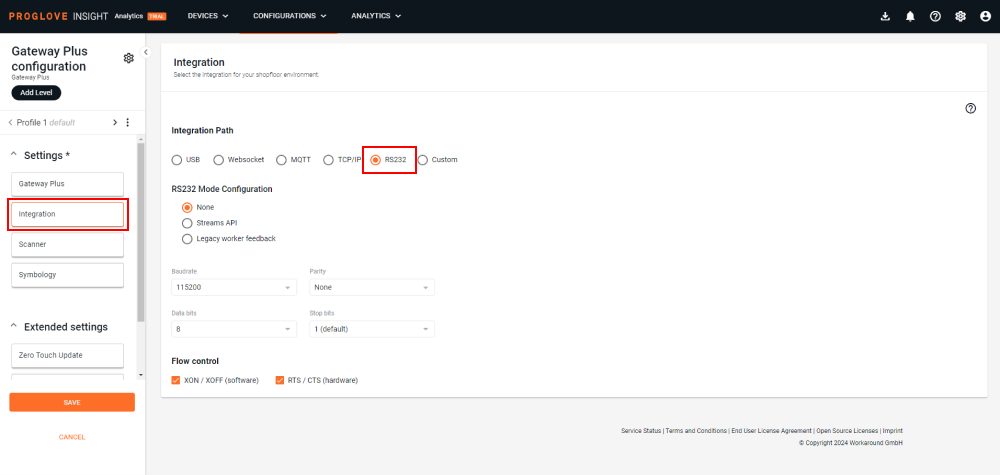
RS232
RS232 integration path allows you to transfer the barcode content through a serial port, enabling an asynchronous serial protocol. The data is transmitted in single bits and the receiver needs to be predefined in order to receive and put the data together correctly. The integration comes with Flow control for both software and hardware, ensuring no errors occur during transmission.
For this integration path you can select:
Streams API - Select this option to enable communication using our Streams API, a two-way, message-based .JSON protocol.
Legacy worker feedback - Select this option to enable sending messages to the connected scanners in order to notify workers about an event, and type in the number of seconds after which the feedback should time out.
Baudrate - The rate at which information is transferred in a communication channel. Default and maximum rate is 115200 bauds.
Parity - Easy way to error-check the transmission. Parity can be either Even, Odd, Mark or Space. The default setting is None.
Data bits - Measurement of the actual data bits contained in the code or content that needs to be transferred. For a standard ASCII code, up to 7 data bits are enough. The default setting is 8 bits, which is a requirement when using an extended ASCII code.
Stop bits - Stop bits signal the end of a communication packet and can help synchronize different clocks on the serial devices. By default, 1 stop bit will be included in the data transfer.
Flow control - Depending on the level and type required, you can select software, hardware or both to handle the communication control.
Custom
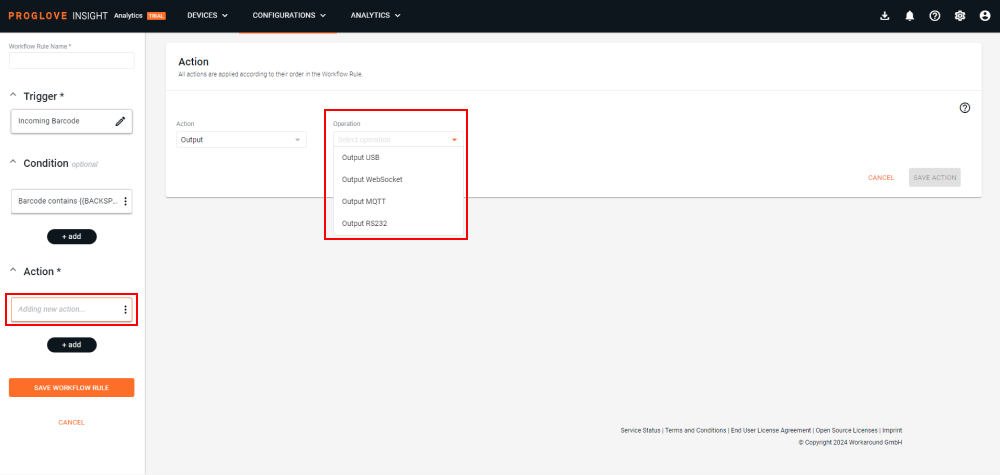
The Custom option allows you to select one of the above integration paths as a way of sending barcode data and customize the output behavior by creating specific Workflow rules.
You can also enable sending data over USB, WebSocket or MQTT at the same time.
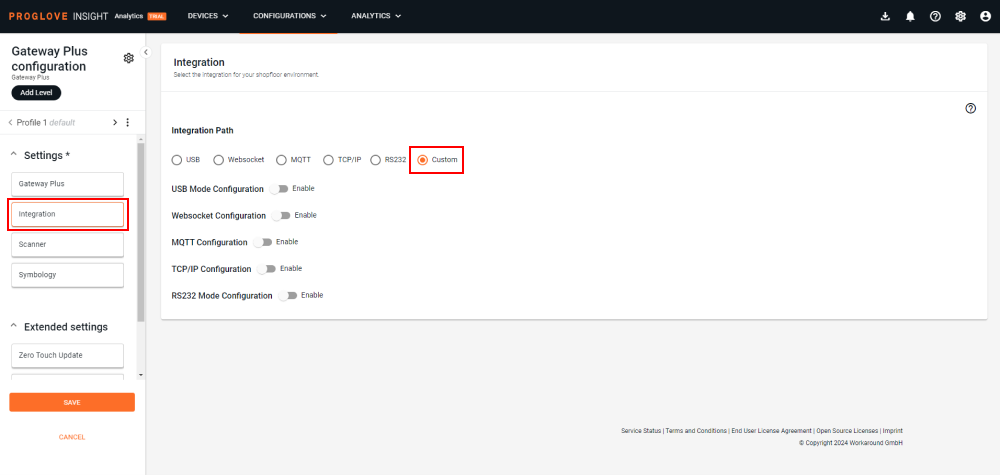
In this case, you must define a Workflow Rule for all active outputs - Output USB, Output WebSocket and Output MQTT.
Note
When selecting the Custom integration path, be sure to define the output behavior using the Action setting in Workflow Rules or the barcode content will not be sent.
If the Gateway Plus is connected via USB to a power source but not a host system, leave the USB Mode Configuration disabled and only enable the other configuration modes, such as WebSocket and/or MQTT. If you enable the USB option when it is not a host system, the Gateway Plus will keep trying to send data using that output but it will not work.
Test MQTT and WebSocket connections
This section provides instructions for testing and debugging connections between ProGlove Connectivity devices and scanners using MQTT and WebSocket protocols. The process enables a low-code testing environment and is performed with the help of Node-RED. The instructions also provide a Dockerfile and necessary configuration files to set up an environment on your local machine for testing or mocking workflows related to ProGlove devices and scanners. You will find details on how to get the necessary file files, configure your connectivity devices, import examples, and replicate workflows, for both the MQTT and WebSocket integrations.
Prerequisites for both integration paths:
Docker Desktop installed on your computer
Node-RED running on your computer
Set up the testing environment
Follow the steps listed below to set up the right environment and test or debug your devices using MQTT and WebSocket protocols.
Download the project file from our repository. Unzip the file and open it on your computer.
For access to the repository, reach out to your ProGlove representative.
Change directory to your local root and run the
docker-compose upcommand.Run Node-RED on your local IP (browse to: http://localIPgoeshere:1880) and import the flow you wish to test, from the two integration path types listed below. The example flows can also be found here.
Create and apply a Gateway device configuration in INSIGHT. Select the relevant Integration Path, and fill in the IP address and topic fields (see note below).
Deploy the flow in Node-RED and scan a barcode with the connected ProGlove scanner.
The details of the scanned barcode and device information will be displayed in Node-RED within the debug panel on the right-hand side.
Note
For MQTT integrations, make sure that the topic defined in your Gateway device configuration matches the one defined within the flow. The topic must start with
shared/, followed by free input. Note that the topic defined in Node-RED also requires a suffix/#.Example:
shared/test.proglove(in INSIGHT device configuration),shared/test.proglove/#(in Node-RED).Add your IP address to the flow in Node-RED. Open the node Properties and edit the Server field to match your local IP address.
MQTT integration path flow
[
    {
        "id": "e0d61b6d.07e648",
        "type": "tab",
        "label": "multi in / one out mqtt",
        "disabled": false,
        "info": "# A multiple input / one output mqtt example \n\nClick either button to publish a string message through mqtt.\n\nThe topic on the mqtt output node is left blank. \nIt will pass along the topics that are set in the inject nodes.\n\nThe mqtt input node uses a wild card (button/#) topic to process messages for either node."
    },
    {
        "id": "6f770fd1.93455",
        "type": "mqtt in",
        "z": "e0d61b6d.07e648",
        "name": "mqtt out",
        "topic": "shared/test.proglove/#",
        "qos": "2",
        "datatype": "auto",
        "broker": "6720096c.db5368",
        "x": 230,
        "y": 200,
        "wires": [
            [
                "d775a7be.6dd4b8"
            ]
        ]
    },
    {
        "id": "d775a7be.6dd4b8",
        "type": "debug",
        "z": "e0d61b6d.07e648",
        "name": "debig mqtt subscriber ",
        "active": true,
        "tosidebar": true,
        "console": false,
        "tostatus": false,
        "complete": "payload",
        "targetType": "msg",
        "x": 530,
        "y": 200,
        "wires": []
    },
    {
        "id": "12086d55.0329a3",
        "type": "comment",
        "z": "e0d61b6d.07e648",
        "name": "mqtt debug",
        "info": "configuer the mqtt out node with you mqtt server settings.\n\nin the example it is configured to connect with local mosqutto mqtt broker.\n\nNote: add 'shared/' prefix to the topic name\n\n",
        "x": 250,
        "y": 160,
        "wires": []
    },
    {
        "id": "26a0cdc8.942a52",
        "type": "comment",
        "z": "e0d61b6d.07e648",
        "name": "send positive feed back ",
        "info": "configuer the inject json node with the topic name and payload json (what you want to send) ",
        "x": 280,
        "y": 320,
        "wires": []
    },
    {
        "id": "88f6c79.471df38",
        "type": "inject",
        "z": "e0d61b6d.07e648",
        "name": "inject json",
        "topic": "shared/test.proglove/gateway/PGGW000000058/feedback!",
        "payload": "{\"api_version\":\"1.0\",\"event_type\":\"display!\",\"event_id\":\"21d22d49-efbe-4e0c-b109-2e9afb7acacc\",\"time_created\":1546300800000,\"time_validity_duration\":0,\"device_serial\":\"MBMRF25109117\",\"display_template_id\":\"PG1A\",\"display_refresh_type\":\"DEFAULT\",\"display_fields\":[{\"display_field_id\":1,\"display_field_header\":\"\",\"display_field_text\":\"Scan the next package\"}]}",
        "payloadType": "json",
        "repeat": "",
        "crontab": "",
        "once": false,
        "onceDelay": 0.1,
        "x": 240,
        "y": 400,
        "wires": [
            [
                "6dc44288.6a240c"
            ]
        ]
    },
    {
        "id": "6dc44288.6a240c",
        "type": "mqtt out",
        "z": "e0d61b6d.07e648",
        "name": "mqtt publisher",
        "topic": "shared/test.proglove/gateway/PGGW000000058/feedback!",
        "qos": "",
        "retain": "",
        "broker": "6720096c.db5368",
        "x": 440,
        "y": 400,
        "wires": []
    },
    {
        "id": "6720096c.db5368",
        "type": "mqtt-broker",
        "z": "",
        "name": "",
        "broker": "192.168.0.109",
        "port": "1883",
        "clientid": "u",
        "usetls": false,
        "compatmode": false,
        "keepalive": "60",
        "cleansession": true,
        "birthTopic": "",
        "birthQos": "0",
        "birthPayload": "",
        "closeTopic": "",
        "closeQos": "0",
        "closePayload": "",
        "willTopic": "",
        "willQos": "0",
        "willPayload": ""
    }
]
WebSocket integration path flow
[
    {
        "id": "a630fa87.e81178",
        "type": "tab",
        "label": "websocket flow",
        "disabled": false,
        "info": "before deplying make sure you have configured Websocket Server and webSocket Client"
    },
    {
        "id": "5f222690.308858",
        "type": "debug",
        "z": "a630fa87.e81178",
        "name": "Debug Output of websocket",
        "active": true,
        "tosidebar": true,
        "console": false,
        "tostatus": false,
        "complete": "payload",
        "targetType": "msg",
        "x": 630,
        "y": 460,
        "wires": []
    },
    {
        "id": "d0352e11.379a2",
        "type": "websocket out",
        "z": "a630fa87.e81178",
        "name": "WebSocket Client",
        "server": "8794837e.229eb",
        "client": "",
        "x": 590,
        "y": 580,
        "wires": []
    },
    {
        "id": "ad4f5045.02ef7",
        "type": "inject",
        "z": "a630fa87.e81178",
        "name": "Send Test Message",
        "topic": "",
        "payload": "{   \"api_version\": \"1.0\",   \"event_type\": \"scan\",   \"event_id\": \"02114da8-feae-46e3-8b00-a3f7ea8672df\",   \"time_created\": 1546300800000,   \"scan_code\": \"Hello, World!\",   \"device_serial\": \"MDMR000000064\",   \"gateway_serial\": \"PGGW000000058\" }",
        "payloadType": "json",
        "repeat": "",
        "crontab": "",
        "once": false,
        "onceDelay": 0.1,
        "x": 310,
        "y": 580,
        "wires": [
            [
                "d0352e11.379a2"
            ]
        ]
    },
    {
        "id": "555a2f1.5a6ebd",
        "type": "comment",
        "z": "a630fa87.e81178",
        "name": "WebSocket Test Flow",
        "info": "",
        "x": 320,
        "y": 380,
        "wires": []
    },
    {
        "id": "6d56c18b.2b77a",
        "type": "comment",
        "z": "a630fa87.e81178",
        "name": "Display message",
        "info": "",
        "x": 260,
        "y": 620,
        "wires": []
    },
    {
        "id": "4762525f.7aa81c",
        "type": "websocket in",
        "z": "a630fa87.e81178",
        "name": "WebSocket Server",
        "server": "8794837e.229eb",
        "client": "",
        "x": 310,
        "y": 460,
        "wires": [
            [
                "5f222690.308858"
            ]
        ]
    },
    {
        "id": "8794837e.229eb",
        "type": "websocket-listener",
        "z": "",
        "path": "ws://192.168.0.109:1886",
        "wholemsg": "true"
    }
]
Send feedback to Gateway and scanner
To pass any feedback or information back to your scanner and/or your Gateway device, follow the steps below:
Edit the inject json and the mqtt publisher nodes, and ensure the topic field includes the serial number of the relevant Gateway device. Example format shown below:
shared/test.proglove/gateway/PGGW000000058/feedback!
To test a simple Worker feedback command, which is a positive beeping sound from the scanner, use the one listed below. Edit the inject json node and paste the command in the Payload field, ensuring it includes the serial number of the relevant scanner.
{
  "api_version": "1.0",
  "event_type": "feedback!",
  "event_id": "02114da8-feae-46e3-8b00-a3f7ea8672df",
  "time_created": 1546300800000,
  "device_serial": "M2MR111100928",
  "feedback_action_id": "FEEDBACK_POSITIVE"
}
Note
To test different actions, see the available Supported streams for more commands.
Deploy the flow in Node-RED.
Click the inject json node to activate the command. If you used the Worker feedback command listed above, as a result the scanner will beep each time you click the node.
Test ProGlove scanners with a display
To test ProGlove scanners with a display, use the steps and command listed below:
Edit the inject json and the mqtt publisher nodes, and ensure the topic field includes the serial number of the relevant Gateway device. Example format shown below:
shared/test.proglove/gateway/PGGW000000058/display!
Edit the inject json node and paste the command in the Payload field, ensuring it includes the serial number of the relevant scanner. This will show the PG3 screen template with left and right headers.
{
  "api_version": "1.2",
  "event_type": "display!",
  "event_id": "02114da8-feae-46e3-8b00-a3f7ea8672df",
  "time_created": 1546300800000,
  "time_validity_duration": 10000,
  "device_serial": "MDMR000000064",
  "display_template_id": "PG3",
  "display_refresh_type": "DEFAULT",
  "display_fields": [
    {
      "display_field_id": 1,
      "display_field_header": "Left",
      "display_field_header_right": "Right",
      "display_field_text": "Text 1"
    },
    {
      "display_field_id": 2,
      "display_field_header": "Left",
      "display_field_header_right": "Right",
      "display_field_text": "Text 2"
    },
    {
      "display_field_id": 3,
      "display_field_header": "Left",
      "display_field_header_right": "Right",
      "display_field_text": "Text 3"
    }
  ]
}
Click the inject json node to activate the command. As a result, the template with sample text will be shown on your scanner's display.