Update Gateway firmware manually
Prerequisite: Gateway firmware image file downloaded from INSIGHT webportal to your desktop.
Connect your Gateway to your desktop via USB cable.
The Gateway boots up in about one minute and LED 1 (USB) glows green.
Scan the Pairing Barcode on your Gateway with your scanner.
Your scanner connects to the Gateway and the LED 2 (Scanner) glows green.
Scan the barcode below to enable the Gateway as a Mass storage device.

The Gateway displays as a mass storage device on your desktop.

Copy the Gateway firmware image file to the Gateway mass storage device, next to the Status folder.
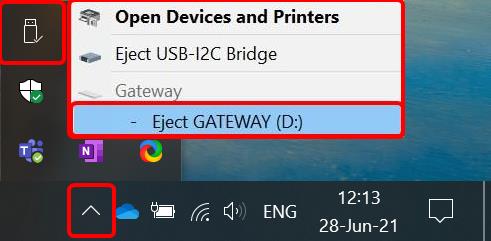
Eject the Gateway mass storage device.
LEDs flash green and purple while the new version installs. The Gateway restarts and glows green when done.
Caution
Do not disconnect the Gateway cable from desktop during the update. The configuration update takes a couple of minutes.
Note
During the reboot, the Gateway might not display any LED feedback for a few seconds.
Update Gateway firmware manually on Linux
Prerequisite: Gateway firmware image file downloaded from INSIGHT webportal to your desktop.
Connect your Gateway to your desktop via USB cable.
The Gateway boots up in about 1 minute and its USB LED glows green.
Scan the Pairing Barcode on your Gateway with your scanner.
Your scanner connects to the Gateway and the Scanner LED glows green.
Scan the barcode below to enable the Gateway as a mass storage device.
The Gateway displays as a mass storage device output of the
lsblkcommand.Example 10. ExampleNAME MAJ:MIN RM SIZE RO TYPE MOUNTPOINT sda 8:0 0 476.9G 0 disk ├─sda1 8:1 0 768M 0 part ├─sda2 ├─ [...] sdb 8:16 1 1G 0 disk
Note
The exact device name may vary on your system. To find it, you can run
lsblkbefore the Gateway is connected and note the output. Connect the Gateway and runlsblkagain. The only device name that displays when the Gateway is connected is the one you must mount.Mount the Gateway as a mass storage device:
$ sudo mkdir /mnt/proglove-gateway
$ sudo mount /dev/sdb /mnt/proglove-gateway
Copy the Gateway firmware image file to the Gateway mass storage device, next to the Status folder:
$ sudo cp ~/Downloads/gateway_1.10.0.proupdate /mnt/proglove-gateway
Eject the Gateway mass storage device:
$ sudo eject /dev/sdb
LEDs flash green and purple while the new version installs. The Gateway restarts and all LEDs glow green when done.