Add a Workflow Rule
Under Workflow Rules in the left configuration menu, click Add Rule.
The Workflow Rule page displays the Trigger section automatically.
In the top left corner, type in the Rule Name.
In the Trigger section, select the action that initiates the rule and Save Trigger.
Under Condition, click Add or select Add Condition in the Success modal.
The Condition section displays in the right-side panel.
In the Condition section, define the condition by selecting from the drop-down menus and Save Condition. If left empty, the Action will be applied whenever the Trigger happens.
The Success modal window displays the Add Action and Add Condition buttons.
In the left panel, under Action, click Add or select Add Action in the Success modal.
The Action section displays in the right-side panel.
In the Action section, define the action by selecting from the drop-down menus and Save Action.
The Success modal window displays
At the bottom left, select Save Rule.
The rule displays in the Workflow Rules section.
Trigger
When creating a rule, select a Trigger to designate when the rule is applied:
Incoming Barcode - the rule is executed when scanned barcode data is received
Button - Double-press - the rule is executed when you double-press the triggering button on the glove (trigger).
Note
You can only add one Trigger per Workflow Rule.
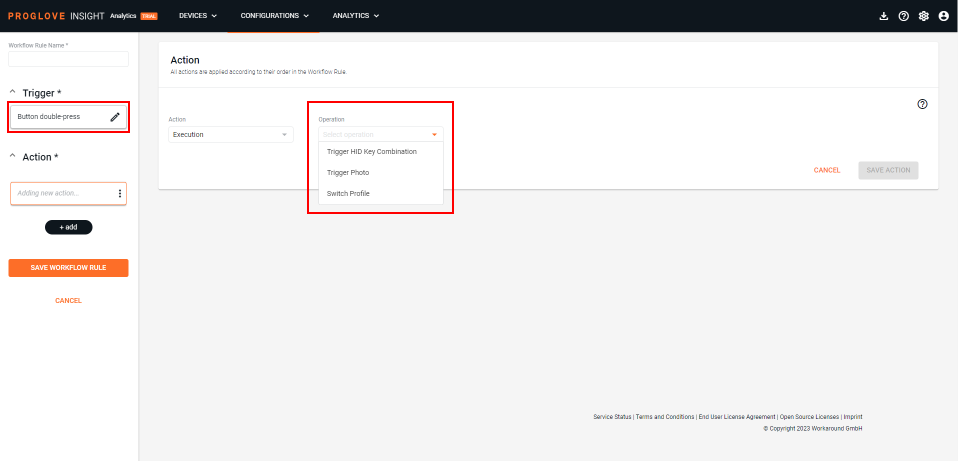
Button double-press as Trigger
When selecting the Button double-press function as a Trigger in Workflow Rules, Conditions are exempt from the logic and you only need to define the Action that follows. There are three available options you can choose from:
Trigger HID Key Combination - triggers the specified Key Combination inside the barcode content starting with the selected Modifier and Key
Trigger Photo - triggers the Photo Reporting feature on your scanner
Switch Profile - triggers a change of profile within your configuration (this is only available for configurations with more than one profile)
Conditions
If you select the Incoming Barcode as the Trigger, you can add certain Conditions to specify when the rule is executed.
Important
You can add multiple Conditions in a Workflow Rule. All Conditions must be met for the Workflow Rule to be executed.
If no Conditions are set, the Action will be applied whenever the Trigger happens.
You can add Conditions for:
Barcode content
For the Barcode content condition, you can select the following operations:
Barcode content is equal - Actions are only executed if the barcode content is identical to the entered value
Barcode content is not equal - Actions are only executed if the barcode content is different from the entered value
Barcode content does contain - Actions are only executed if the barcode content contains the entered value
Barcode content does not contain - Actions are only executed if the barcode content does not contain the entered value
Barcode content does match Regex - Actions are only executed if the barcode content matches the entered Regular expression
Barcode content does not match Regex - Actions are only executed if the barcode content does not match the entered Regular expression.
Barcode length
For the Barcode length condition, you can select the following operations:
Barcode length is equal - Actions are only executed if the number of characters in the barcode content is identical to the entered number
Barcode length is not equal - Actions are only executed if the number of characters in the barcode content is different than the entered number.
Symbology
For the Symbology condition, you can select the following operations:
Symbology is one of - Actions are only executed if the scanned barcode symbology matches the selected symbologies
Symbology is not one of - Actions are only executed if the scanned barcode symbology does not match any of the selected symbologies.
Actions
After you selected the Trigger and the Condition, you can specify what happens when they are met by defining an Action.
There are three Action types: Execution, Barcode transformation and Output.
Execution
Make a Beep - the mobile device beeps
Screen Time Reset - resets the sleep timer for your Android device's screen
Toggle Keycode - presses a specific keycode on the virtual keyboard (requires the Software Keyboard integration). Possible keycodes can be found here (all constants starting with KEYCODE_)
Hide Keyboard - On-screen keyboard is hidden
Open Link in Browser - opens the specified link in the browser (Make sure to include the protocol, e.g. https://insight.proglove.com/home)
Open link from Barcode in Browser - opens the specific link contained in the scanned barcode in the browser. (Make sure to whitelist the domain for a secure process and that only barcode contains only the link and nothing else).
Barcode transformation
This category of actions describes how barcode content can be manipulated.
Note
Actions using Key Combinations and Delay are only available when using USB HID as an Integration Path on the Gateway.
Prepend text - the entered string is inserted as the prefix of the barcode
Append text - the entered string is inserted as the suffix of the barcode
Insert at position - inserts the specified string inside the barcode content starting at the selected position (e.g. from the third character)
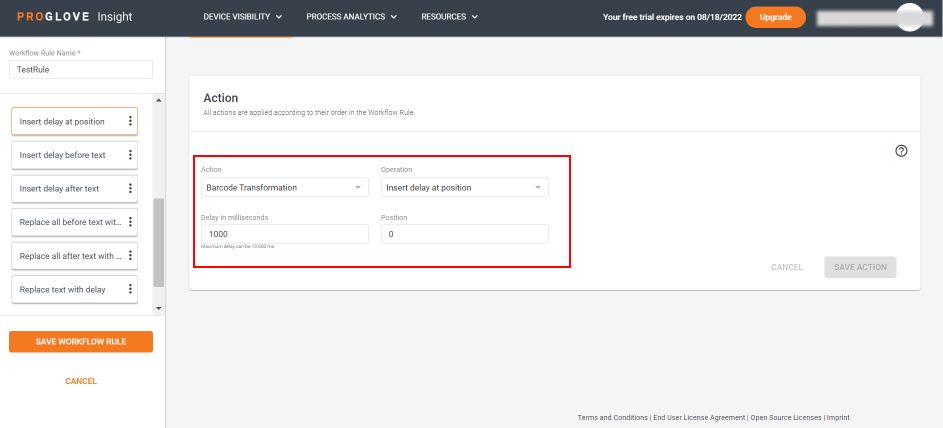
Insert delay at position - inserts a delay at a specific position
Insert before text - inserts the specified string before a specific text content inside the barcode
Insert delay before text - the delay is inserted as a prefix of the barcode
Insert after text - inserts the specified string after a specific text content inside the barcode
Insert delay after text - the delay is inserted after the matching text
Replace regex - you can enter a Regular Expression and replace it with the designated replacement Text (To learn more, see Regular Expressions)
Replace range - replaces the characters between the two specified character positions with the entered replacement Text
Prepend Key Combination - the specified Key Combination is inserted as the prefix of the barcode
Append Key Combination - the specified Key Combination is inserted as the suffix of the barcode
Insert Key Combination at Position - inserts the specified Key Combination inside the barcode content starting at the selected position (e.g. from the third character)
Replace Range with Key Combination - replaces the characters between the two specified character positions with the specified Key Combination
Replace Regex with Key Combination - you can enter a Regular Expression and replace it with the specified Key Combination (To learn more, see Regular Expressions)
Replace all before text - replaces all content before a specific text in the barcode content
Replace all before text with delay - inserts a delay as a prefix of the barcode instead of any content that comes before the matching text
Replace all after text - replaces all content after a specific text in the barcode content
Replace all after text with delay - inserts a delay as a suffix of the barcode instead of any content that comes after the matching text
Replace text - replaces a specific text from the barcode content
Replace text with delay - inserts a delay instead of the matching text
Delete range - deletes the characters between the two specified character positions
Delete regex - deletes the Regular Expression
Delete all before - deletes all before a specified string inside the barcode
Delete all after - deletes all after a specified string inside the barcode
Delete text - deletes a specific text from the barcode content
Output
This group of Actions only displays if you select a Custom Integration path. It allows you to define a custom way of transferring the barcode and applying the workflow rule.
Note
Output Actions are always executed last, regardless of the order inside the workflow rule.
Send via WebSocket - sends the scanned barcode content via WebSockets using a pre-defined port number
Send via USB - sends the scanned barcode content via USB
Send via MQTT - sends the scanned barcode content via MQTT
Key Combinations
A Key Combination is the combination of a Key (an HID keycode or an ASCII character) associated with a group of Modifiers. Individual keys can be also executed without modifiers, and a maximum of 6 keys can be pressed simultaneously. The Gateway ensures that all keys are released and do not stay pressed forever.
The following Modifiers are supported:
Left Control
Left Shift
Left Alt
Left Super
Right Control
Right Shift
Right Alt
Right Super.
Note
Key Combinations are only available when using the USB HID Integration Path.
Delay
The delay actions allow you to insert a delay before, during, or after the transmission of a barcode from the Gateway to the GUI (Graphical user interface). GUI applications that need to wait for a response from another system (i.e. database loading) can now allow enough time before the next step. There are 6 different options you can choose from, or combine them all to support your workflow, as shown in the image below.
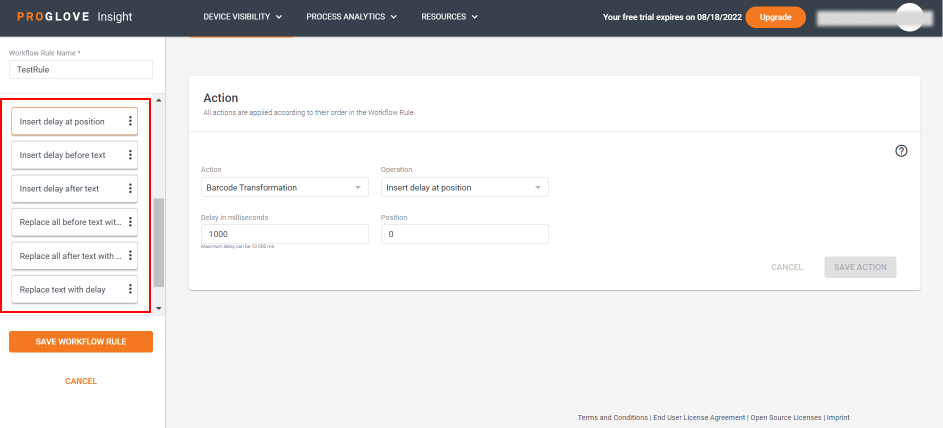
Default delay time is set to 1 second (1000ms) and a maximum delay of 10 seconds (10000ms) is allowed.
Important
Delay actions do not support regular expressions and only include text matching.
This feature is available on Gateway v.2.2.0 and above.