Connect Gateway to Insight Webportal
To communicate with our cloud platform, you need to connect your Gateway to Insight Webportal.
To do this, you firstly need to define your Process Layout hierarchy and add the Gateway as a connectivity device.
You then need to enable your Gateway to connect to your Wi-Fi router by provisioning each Gateway with login credentials to your enterprise network.
Important
Wi-Fi network settings must be defined before importing the credentials via network.json file. For more details, see: importing credentials and additional Wi-Fi settings.
Process Layout
Use the Process Layout hierarchy to build out a representation of your physical environment's process structure. Define multiple organizational levels and assign your devices to their respective meaningful groups.
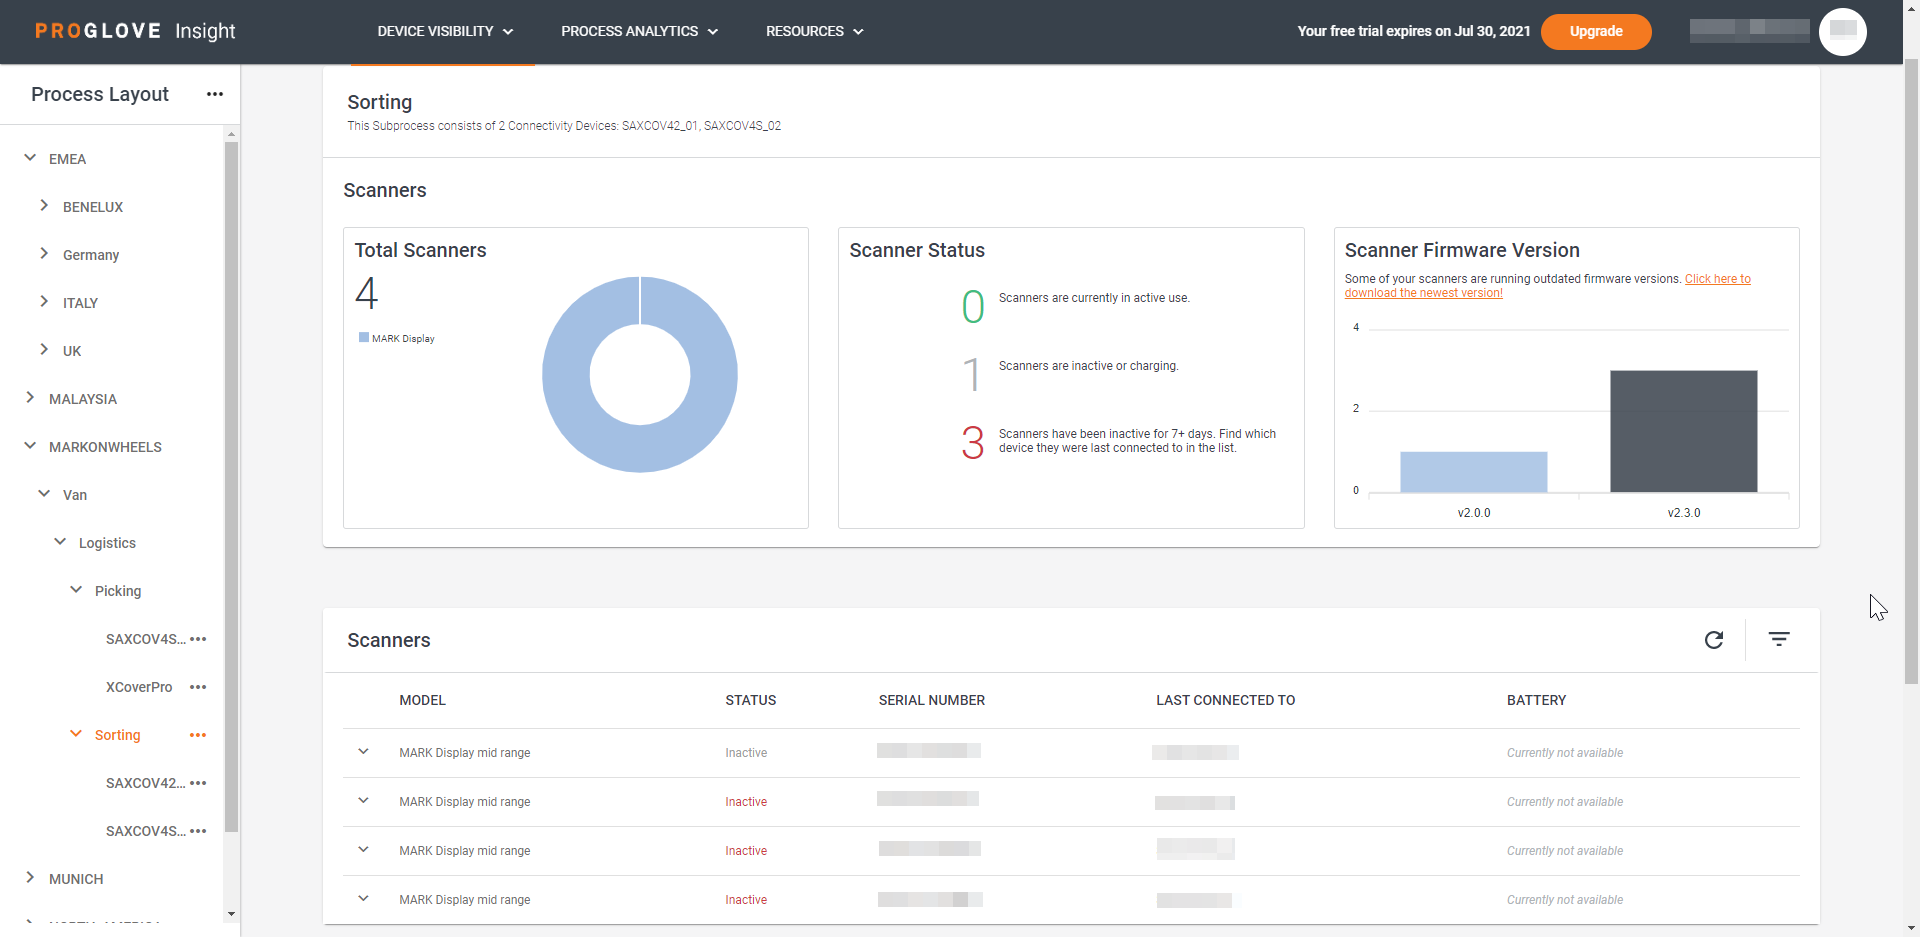
By connecting your devices to Insight Webportal and adding them to a Process Layout level, the data of all the connected scanners and Connectivity Devices is collected under that level. This allows you to analyze and compare data in these different processes over time and with each other in the Performance Analysis section under Process Analytics.
There are four Process Layout levels: Location, Process Group, Process, and Subprocess. Use them to pinpoint the performance and effort of your scanning devices by adding your Connectivity Devices to each level and manage your devices across locations and processes.
Your Process Layout can have:
An unlimited number of Locations, Process Groups, Processes, and Subprocesses.
An unlimited amount of Connectivity Devices per level.
Note
It is recommended to only add a maximum of 10 Connectivity Devices per level to ensure good quality of data. Consider splitting your levels if the number of devices per level exceeds 10.
In Example 1, we add a level and divide the layout into the Picking, Shipping and Outbound processes, therefore avoiding having more then 5 Processes under one level (PA, PB, SA, SB, SC, OA).
Europe
Munich
Picking
Station PA
Insight mobile 1
Gateway 2
Insight mobile 3
Station PB
Insight mobile 4
Insight mobile 5
Shipping
Station SA
Gateway 6
Station SB
Gateway 7
Station SC
Gateway 8
Outbound
Station OA
Gateway 9
Create Process Layout levels
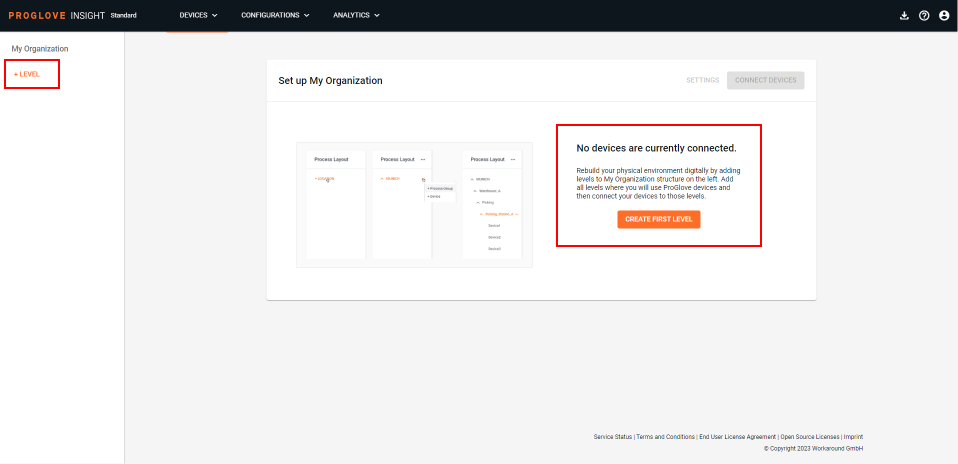
In the Process Layout panel, click the three dots (...) on the right and select + Location.
The modal Add Location window displays.
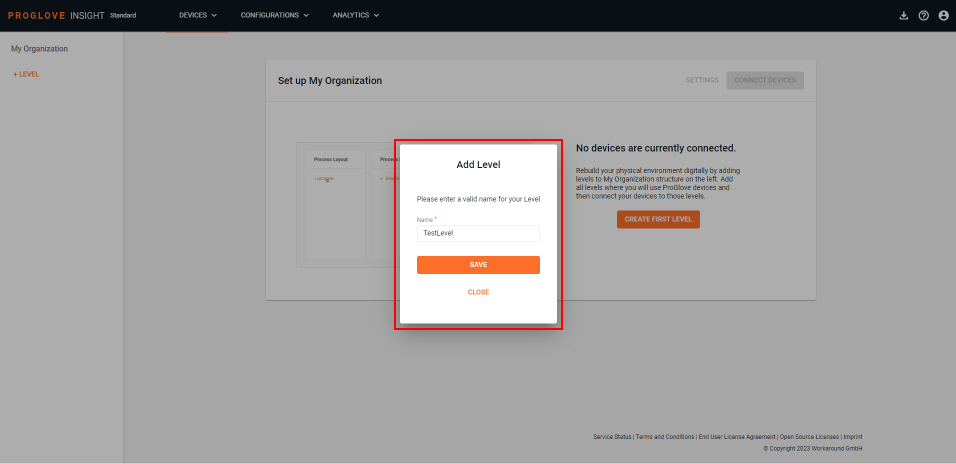
Enter the name of the location where the device will be used and click Save.
The entered location displays in the Process Layout panel.
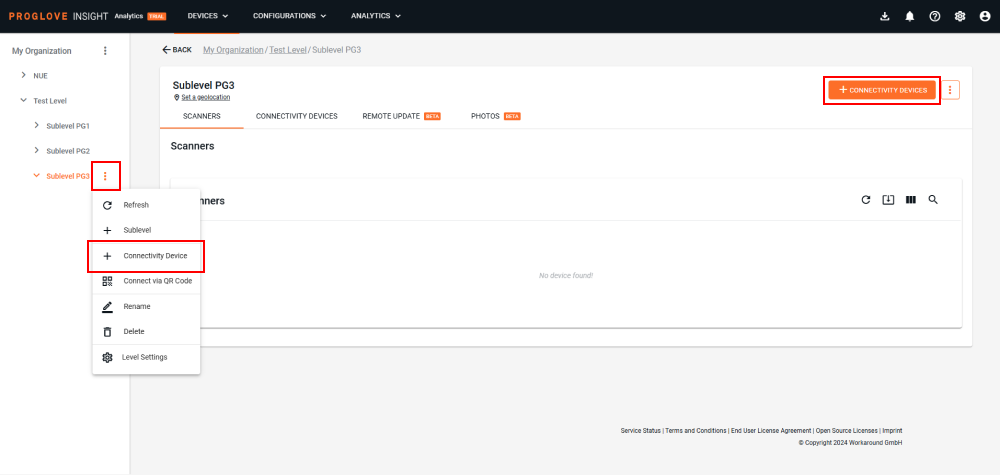
Click the three dots next to the defined location and select + Process Group.
Enter the name of the process group and click Save.
Click the three dots next to the defined process group and select + Process.
Enter the name of the process and click Save.
Click the three dots next to the defined process and select + Subprocess.
Enter the name of the defined Subprocess and click Save.
Your Process Layout hierarchy is now defined. You can now add Connectivity Devices to the desired levels.
Note
If you make a mistake when creating your layout, you can Rename every Process Layout level or Move it under any existing level. Use the three dots next to each level to access the drop-down menu. You can also Delete a Process Layout level that has no child levels under it.
You can also Rename, Delete, or Move Connectivity devices to a different level.
Only scanning devices that have scanned at least once are displayed in the Insight Webportal Devices section.
Tip
Setting up the complete Process Layout hierarchy before enrolling Connectivity Devices like Gateway and Insight Mobile (Android) is highly recommended. Make sure it resembles your organizational structure and consists of the hierarchical levels you need before connecting devices. This will make it easier for you to manage devices. You can test a smaller number of devices but you might have to re-enroll the devices later when building your complete hierarchy.
Connect Gateway with a Staging certificate
To send scanner and other data to our cloud platform, you need to connect your Gateway devices to your Insight Webportal account. Staging certificates allow you to connect multiple Gateway devices to Insight Webportal with the same file. Each staging certificate/template is related to a process level under which connected devices will show when they are enrolled for the first time.
Prerequisite: Process Layout hierarchy defined with at least one Location.
In the Insight Webportal → Device Visibility, select Devices.
After finishing the setup of your organizational structure in the Process Layout panel, click on the Connect Devices button in the main section or click on the three dots (...) next to the defined Location and select + Connect Devices.
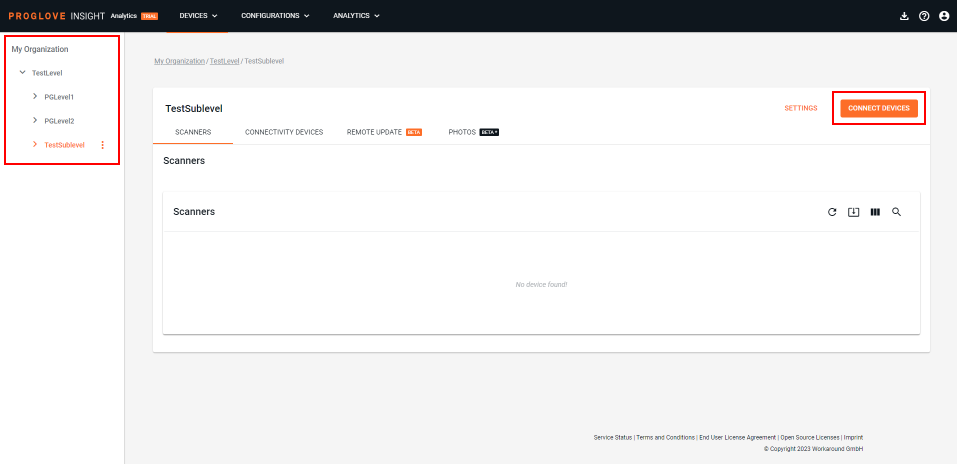
A Select a connectivity device window displays.
Select Gateway.
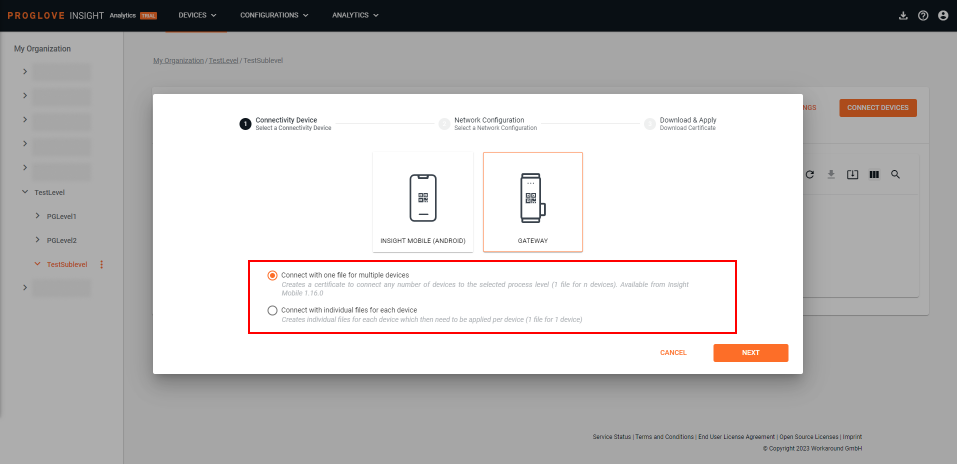
The section displays two options. Select Connect with one file for multiple devices to use a single staging certificate file across multiple devices, or Connect with individual files for each device to create a staging certificate/template per device.
Select the right option for your environment.
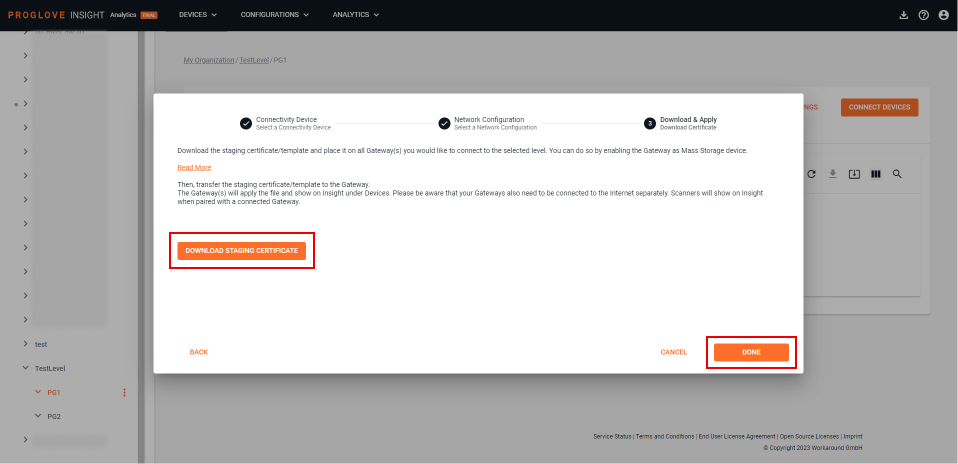
If you selected the first option, a window with the Download staging certificate button will appear. Follow the instructions and click Done when finished.
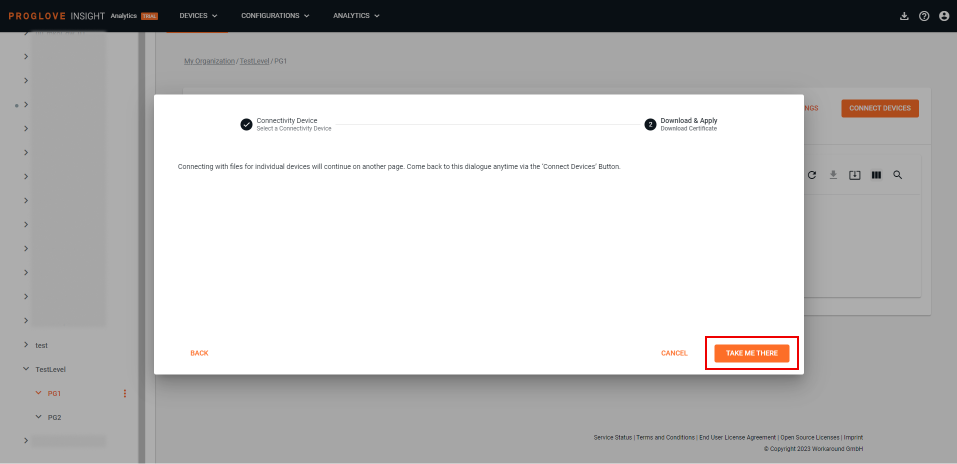
If you selected the second option, a message will be prompted informing you that you need to set up a new Connectivity device, which happens on a different page. Click the Take me there button to redirect to it automatically.
The Create Connectivity Devices section displays the Process Layout hierarchy that has been open or which you selected in step 1.
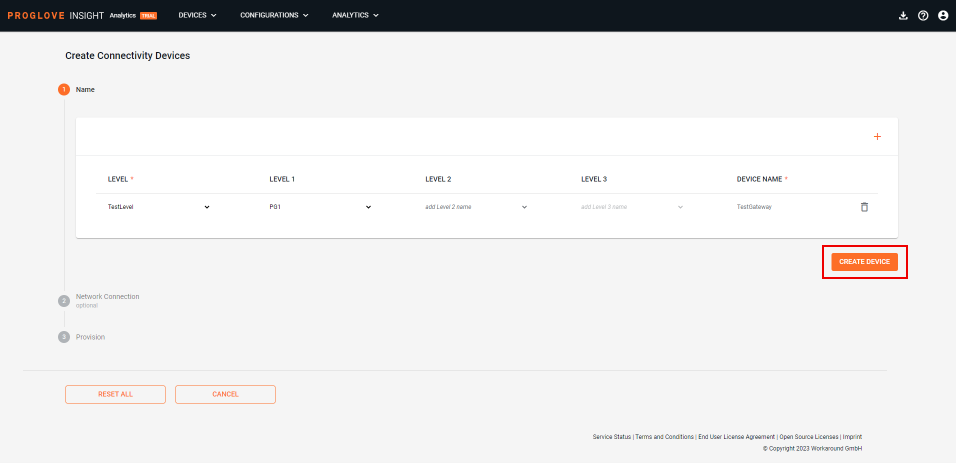
For each device, select the right level and enter the Device Name. Then click Create Device.
The Network Connection section displays.
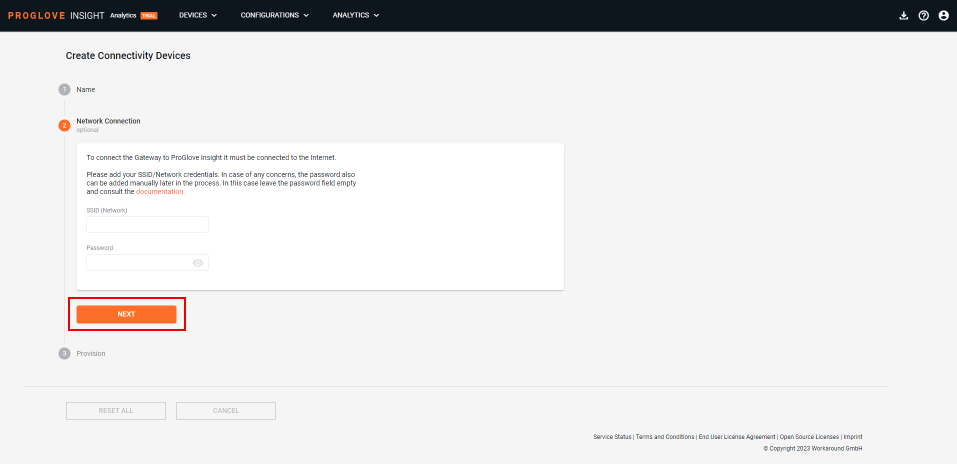
Type in your router's/network's SSID (Network) and Password, and select Next. This section is optional. You can leave the fields empty and add the credentials directly to the
network.jsonfile later. To find out how to use the.jsonfile, see Connect to Wi-Fi by importing credentials in the network.json file.The Provision section displays.
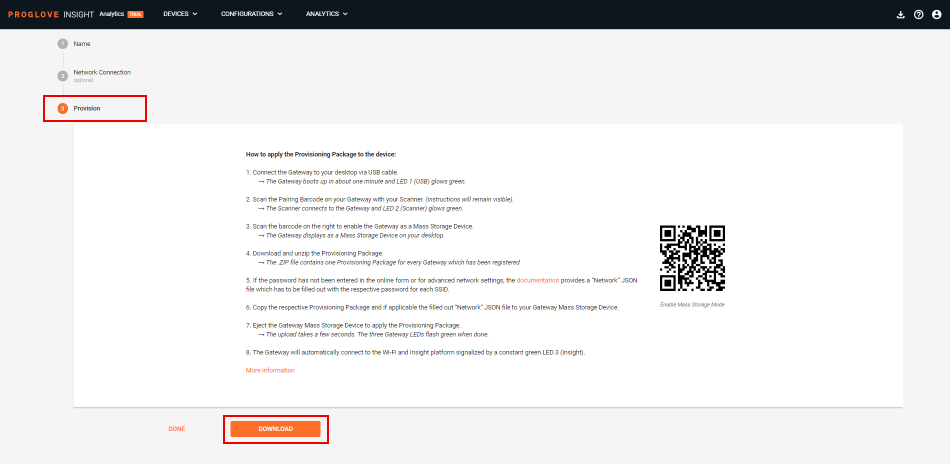
Select Download to export your Provisioning package in a .zip file.
The provisioning package (.zip) downloads with a provisioning file for each device.
Select Done.
The Devices screen displays and shows the devices created.
Note
Once the
network.jsonfile is processed by the Gateway, it is no longer accessible anywhere on the Mass storage device, therefore the network details are not exposed anywhere.As ProGlove does not store any user data on Insight Platform, if you re-download the provisioning package for the already connected device, you will be asked to provide the SSID password again.
Apply the provisioning file
Connect the Gateway’s USB cable to your desktop.
The Gateway boots up in about 1 minute. The USB LED glows green constantly.
Scan the Pairing barcode on the Gateway with your scanner.
The scanner connects to the Gateway and the Scanner LED glows green.
Scan the barcode below to enable the Gateway as a Mass storage device.

The Gateway displays as a Mass Storage device on your desktop.
Unzip the downloaded provisioning package.
The extracted .zip file contains one provisioning file for every registered Gateway.
Note
If the SSID Password is not provided, you need to enter the password in the network.json file. To learn how to use the .JSON file, see Connect to Wi-Fi by importing credentials in the network.json file.
Copy the corresponding provisioning file and (optional) a zipped network.json file to your Gateway Mass storage device.
Eject the Gateway Mass storage device.
The upload takes a few seconds. All three LEDs flash green when done. The Gateway automatically connects to Wi-Fi and Insight Webportal. The Cloud LED glows green.
Note
Ejecting the Mass storage device may vary depending on your operating system.
Make sure to Safely Remove / Eject the Mass storage device on your desktop but do NOT disconnect the Gateway’s USB cable during upload.