Connect an Android device
To send scanner and other data to INSIGHT webportal, you need to connect your Android devices to your INSIGHT account.
Prerequisite: My Organization hierarchy defined with at least one Level.
Learn more about the ways to connect Android devices to Insight:
Connect with individual files for each device
This method is available for all INSIGHT Mobile (Android) versions and is necessary if connecting devices using INSIGHT Mobile version 1.15.0 and below.
It is required to use individual staging certificates files for each device you are trying to connect, and the process is limited to connecting a maximum of 10 devices at a time. Connecting many devices to Insight can take some time, so using staging certificates is recommended.
Connect with one file for multiple devices
This method is recommended for devices using INSIGHT Mobile (Android) 1.16.0 and above.
It allows you to connect multiple Android devices with the same certificate and is the easiest way to connect devices to Insight.
Staging certificates can be applied to the Android devices either via downloading the file, or a base 64 encoded String in managed Google Play setups from Insight Mobile Android 1.19.0, and also via QR Code scan.
Connect Android devices with individual files
You can connect your Android device by downloading provisioning files for each device from INSIGHT and following the procedure described below:
Important
Setting up the complete My Organization hierarchy before enrolling Connectivity Devices like Gateway and INSIGHT Mobile (Android) is highly recommended. Make sure it resembles your organizational structure and has the hierarchy levels you need before connecting your devices. This will make it easier for you to manage the devices. You can test a smaller number of devices but you might have to re-enroll the devices later when building your complete hierarchy.
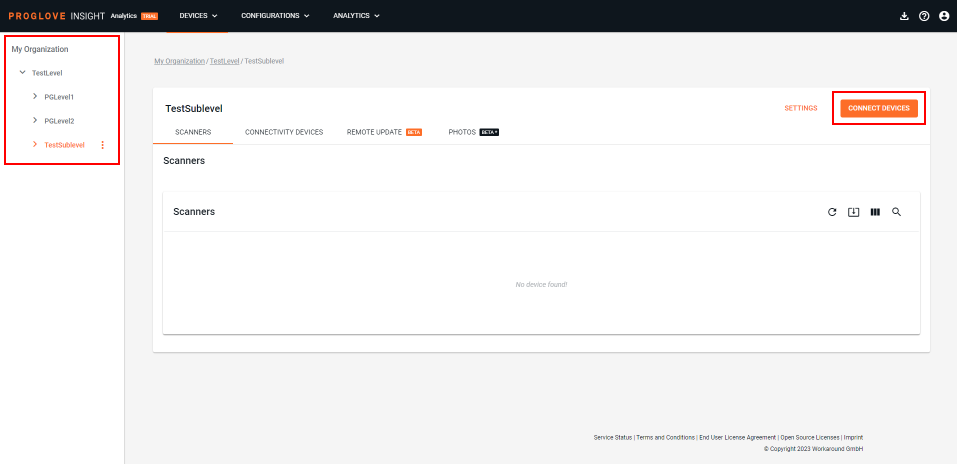
In the INSIGHT webportal → Device Visibility, select Devices.
After you have created your hierarchy in the My Organization panel, click on the Connect Devices in the top-right corner, or click on the three dots (...)next to the desired level and select + Connect Devices.
A Select a Connectivity Device window displays.
Select Insight Mobile (Android) and Connect with individual files for each device., then click Next.
The Create Connectivity Devices section displays the defined My Organization hierarchy.
Enter the Device Name and click Create Device.
The Provision slide panel displays a QR code if you are trying to connect a single device and displays additional options.
Decide how you would like to connect the device(s).
Option 1: Scan the QR codewith the Android device you would like to connect. The device will then automatically download the Provisioning file, connect to INSIGHT and show up in the Connectivity Devices list. (available only when connecting a single Android device)
Option 2: Click Download and save the provisioned .zip file.
Extract the .zip file and upload the Provisioning file to the /sdcard/Android/data/de.proglove.connect/files/ folder on your Android device.
Click Done.
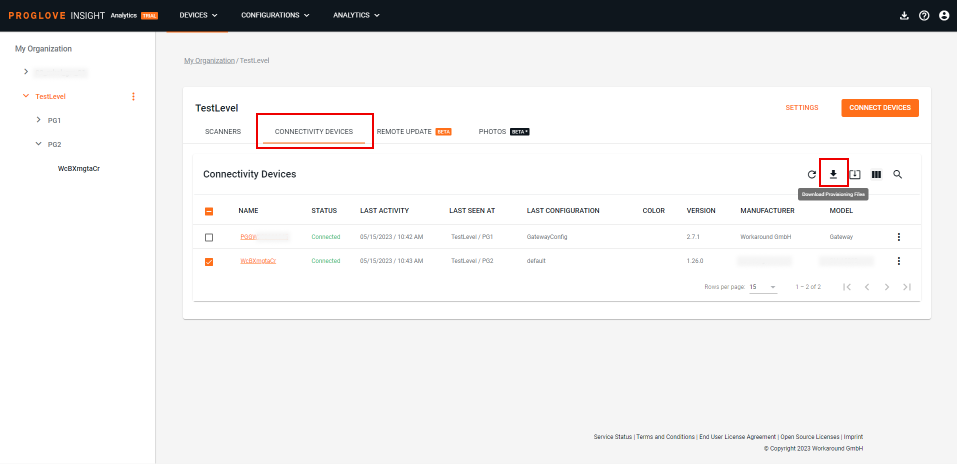
Download the provisioning file from the list
If you click Done before downloading the provisioning file, you can still download the provisioning file by selecting your device from the Connectivity Device List and clicking the Download button.
If you select multiple devices with the checkbox in the list, the downloaded .zip file will contain a provisioning file for every device selected.
Connect an Android device by scanning a QR code
An Android device can be connected to INSIGHT webportal at any point in time by scanning a QR code from a particular lelev in the Devices section. The QR code resembles the staging certificate/template used by the Android device to connect to the My Organization hierarchy on INSIGHT.
Note
This feature is available from Insight Mobile (Android) 1.19.0.
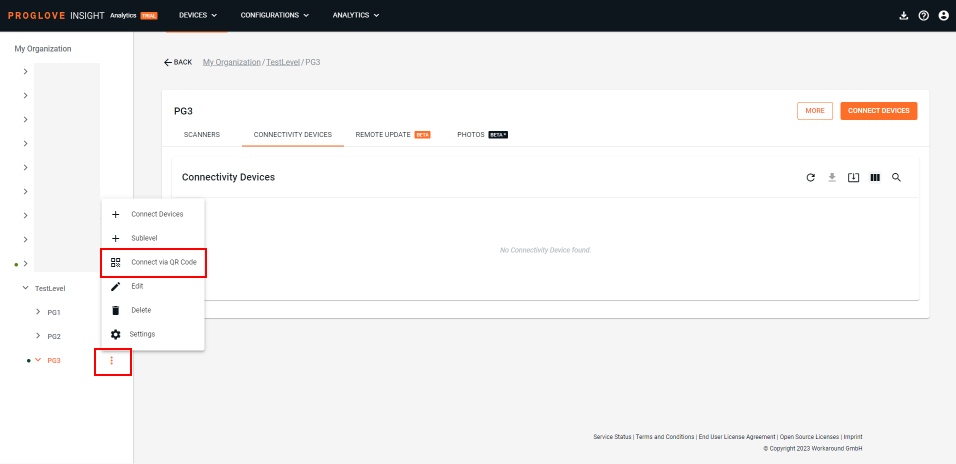
Find the My Organization level to which you would like to connect the Android device.
Open the action menu by clicking on the three dots (...) next to the desired level and click on Connect via QR Code.
→ A modal displaying a QR Code will open.
On your Android device which has INSIGHT Mobile Android installed, open the Connectivity section and scan the QR Code.
→ The Android device connects to the Insight Webportal automatically and displays in the Connectivity Devices list.
Important
Connecting Uniherz Atom devices is not possible by scanning the QR code. We recommend downloading the staging certificate and following the process described here.
Connect Android devices with a single staging certificate
Staging certificates/templates allow you to connect multiple Android devices to INSIGHT webportal using a single file. Each staging certificate/template is related to a process level under which connected devices will be displayed when they are enrolled for the first time.
Prerequisite: INSIGHT Mobile (Android) 1.16.0 and above.
Important
Setting up the complete My Organization hierarchy before enrolling Connectivity devices like Gateway and INSIGHT Mobile (Android) is highly recommended. Make sure it resembles your organizational structure and has the hierarchy levels you need before connecting your devices. This will make it easier for you to manage the devices. You can test a smaller number of devices but you might have to re-enroll the devices later when building your complete hierarchy.
In the INSIGHT webportal → Device Visibility, select Devices.
After recreating your structure and process levels in the My Organization hierarchy, click on the Connect Devices button in the top-right corner. Alternatively, click on the three dots (...) next to the defined level and select + Connect Devices.
A Select a Connectivity Device window displays.
Select Insight Mobile (Android).
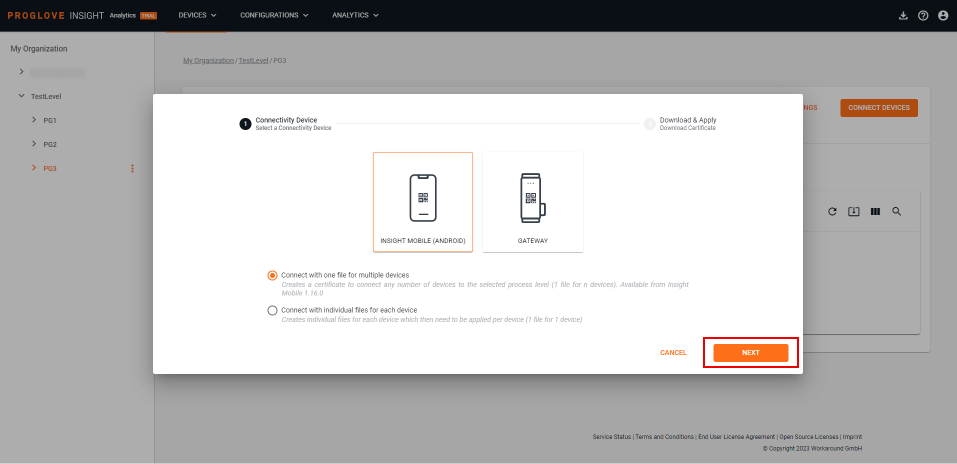
The section displays two options. Select Connect with individual files for each device to create a staging certificate/template per device, or Connect with one file for multiple devices to use a single file across multiple devices.
Select the right option for your environment.
File-based download:
Download Staging Certificate: Downloads the staging certificate and template named after the related process level as a compressed
.fleetfile. The file needs to be placed on the Android device as described in the next step.Scan a QR Code: Available from Insight Mobile 1.19.0 on. Downloads the staging certificate and template via the URL in the QR Code as a compressed
.fleetfile and applies it to the Android device automatically. The device will then show up on Insight Webportal in the Connectivity Devices list.Managed Google Play setup
Required when connecting a device running on Android 10 or higher to make sure to comply with the scoped storage requirements. Generates and downloads a string containing the staging certificate and template which can be applied via Managed Google Play Store.
Place the
.fleetfile containing the staging certificate and template to your Android device(s) under /sdcard/Android/data/de.proglove.connect/files/. You can do so manually or use your EMM (MDM).Start Insight Mobile Android and continue the usual Pairing process.
The device will connect to Insight using the staging certificate.
On Insight, it will show in the Connectivity Devices list under the respective process level.
The name of the device is the same as the ID shown in the Insight Connectivity section on Insight Mobile Android. If you prefer to use a different name, make sure to change it immediately after connecting the device.
Connect an Android device by scanning a QR code
An Android device can be connected to INSIGHT webportal at any point in time by scanning a QR code from a particular lelev in the Devices section. The QR code resembles the staging certificate/template used by the Android device to connect to the My Organization hierarchy on INSIGHT.
Note
This feature is available from Insight Mobile (Android) 1.19.0.
Find the My Organization level to which you would like to connect the Android device.
Open the action menu by clicking on the three dots (...) next to the desired level and click on Connect via QR Code.
→ A modal displaying a QR Code will open.
On your Android device which has INSIGHT Mobile Android installed, open the Connectivity section and scan the QR Code.
→ The Android device connects to the Insight Webportal automatically and displays in the Connectivity Devices list.
Important
Connecting Uniherz Atom devices is not possible by scanning the QR code. We recommend downloading the staging certificate and following the process described here.
Connect by importing proxy settings in the network.json file
If you do not want to include your network's password in the configuration file (created on INSIGHT webportal), you can provide it in the network.json template and upload it directly to your Android device by following these steps:
Create a network.json file
Open a text editor (E.g. Notepad, Sublime Text, VS Code).
Copy the snippet below into the editor.
{
  "wifi": {
	"wifi_auth": [
		{
		    "ssid": "Your SSID",
		    "visibility": "ACCESS_POINT_VISIBILITY_VISIBLE",
		    "wpa_psk": {
		        "psk": "Your Password"
		    }
		}
	]
  }
}
Note
To connect a Gateway device and set up your connection using different authentication protocols, see Connect Gateway to Wi-Fi.
Proxy settings may contain other variables which are relevant for usage on Gateway. Those settings will be ignored on INSIGHT Mobile (Android).
Table 14. Proxy settingsField Name
Description
Type
Example
Default Value
Comment
hostnameHost name of the proxy server that should be used
String, URL format without protocol (http, https prefix)
"mycompanyproxy.com","192.168.101.1",nullnullIf this is null, port is expected to be null as well, and no proxy will be set.
portPort number of the proxy server that should be used
Integer, valid port number
"8080",nullnullIf this is null, hostname should be null as well, and no proxy will be set.
ignore_os_level_proxy_settingsIn case of no specified proxy, check whether to use or ignore proxy settings configured on OS Wi-Fi connection level.
Boolean
true,falsefalseIf no proxy is configured, by default OS level proxy will be used. You must specify as "true" if that proxy should be ignored.
Under
ssid, replaceYour SSIDwith the name of your Wi-Fi network.Under
psk, replaceYour Passwordwith the password for the enteredssid.Save the file as
network.json.Create a
.ziparchive of thenetwork.jsonfile and name itnetwork_config.zip. The.ziparchive file can contain other files, those will be ignored.
Push network_config.zip file to the Android device
To achieve this, run the following command:
adb push path/to/network_config.zip /sdcard/Android/data/de.proglove.connect/files/network_config.zip
Ensure the network_config.zip file is located in the following location: /sdcard/Android/data/de.proglove.connect/files/ and restart the ProGlove INSIGHT Mobile application.
It is not required for the INSIGHT Mobile app to run while pushing the file. If the application was running when the network_config.zip file was pushed, we recommend to restart it so the new proxy settings can be used.
Note
Alternatively, the same command can run over EMMs that support it.
Re-enroll an Android device to INSIGHT using a Staging Certificate
It is possible to use Staging Certificates and Templates to re-enroll devices to INSIGHT webportal at different levels of the My Organization hierarchy.
To do so, follow the steps as described under Connect Android devices with a single staging certificate and place the file on a Connectivity Device that has already been enrolled. The Connectivity Device will then show under the new level to which the Staging Certificate and Template relate.
Connection status
There are five connection statuses:
Not Registered - The Connectivity Device has been created using INSIGHT webportal or INSIGHT API via manual connection but the Provisioning file has not been downloaded or could not be created.
Registering - The Connectivity Device has been created using INSIGHT webportal or INSIGHT API via manual connection, and the Provisioning file has been downloaded and placed on the device. The device is now trying to connect.
Disconnected - The Connectivity Device has not been sending any messages for the last two hours.
Connected - The Connectivity Device has been paired with a scanner at least once and has sent a message within the last two hours.
Unknown - The Connectivity Device is in an undefined connection state.
Verify connection status
There are three ways to make sure your Android device is connected to INSIGHT webportal:
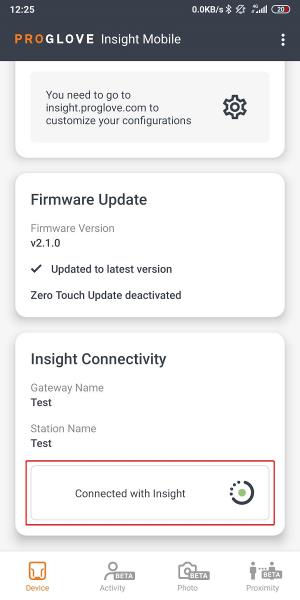
In the INSIGHT Mobile app:
Connect your scanner.
On the Device homepage, scroll down to INSIGHT Connectivity.
The Connection Status displays at the bottom of the screen.
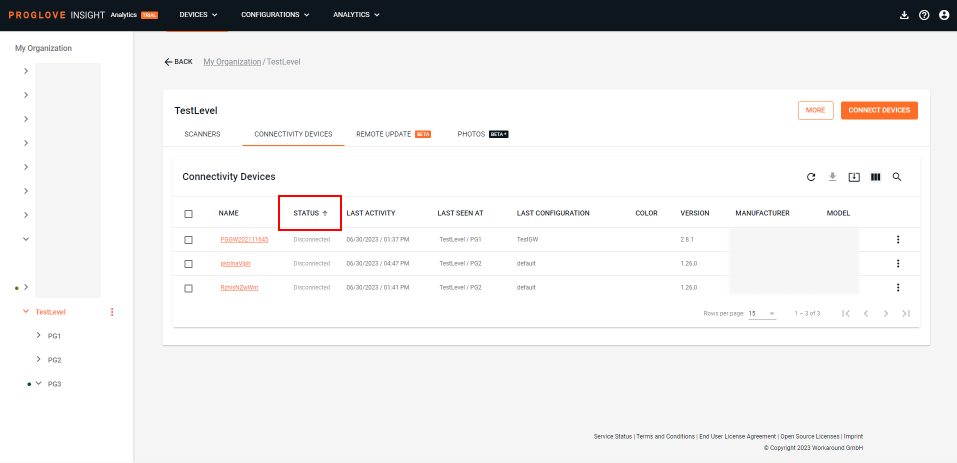
On INSIGHT webportal:
Under Device Visibility, select Devices.
The Connectivity Device List displays.
If registered, your device’s status displays in the Status column.
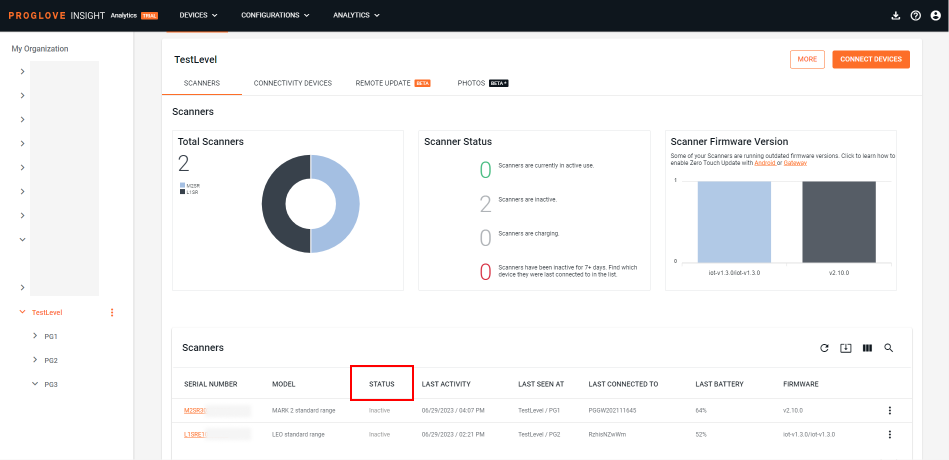
On INSIGHT webportal:
Connect your scanner to Insight Mobile.
Scan a barcode.
Open Insight Webportal.
Under Device Visibility, select Devices.
The connected Scanners list displays.
If connected properly, your scanner’s status displays in the Status column.
Set a custom device name
Using Intent API key broadcast, you can set a device name to match with a third-party system or simply identify a device better, since there are built-in Android 10+ limitations when it comes to sharing device details. This allows you to add a custom value, i.e. customer_custom_identifier, to the staging file within your MDM that will be visible to your workforce in the INSIGHT Mobile (Android) app, and is sent along with the data to INSIGHT Analytics for reporting purposes.
For more details on reporting, see export data.
Note
We recommend setting up the Intent key and value prior to starting the application and work processes.
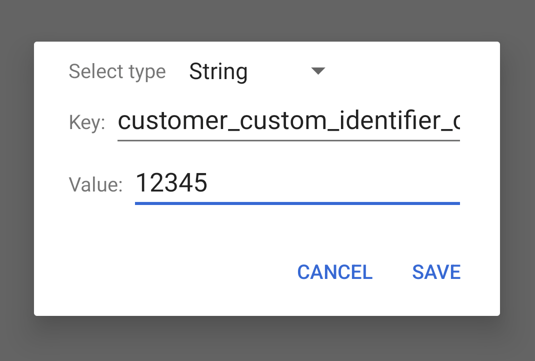
Once the value is set, you can see it displayed as an additional field in the INSIGHT connectivity widget within INSIGHT Mobile, as shown in the image below. That value will also be shared with INSIGHT webportal with every event.
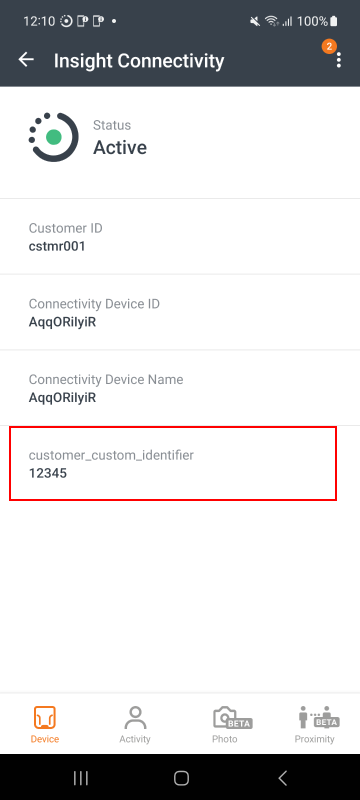
You can change the value by broadcasting a different message, bypass (ignore) it to use alternative integration methods, or remove it when needed. Sending the IGNORE value will simply ignore the entered information and allow the integrator to set the value in a different way (using adb or other API methods). Sending REMOVE as a value will remove the entered information, as well as the customer_custom_identifier field from the INSIGHT Mobile app.
File | Key | Valid values | Supported options |
|---|---|---|---|
|
| Only valid base 64 encoded config files | SET, IGNORE, REMOVE |
|
| Only valid base 64 encoded fleet files | SET, IGNORE |
|
| Any string containing 1 - 256 characters | SET, IGNORE, REMOVE |
Live Data Connection
Use the Process Analytics section of INSIGHT webportal to view live scan data, and the Device Visibility section to track information on connected devices. More details can be found here.
Note
Make sure that your device’s network connectivity is stable when trying to register it on INSIGHT, or when sending data after the registration.