FAQs
- 1. How do I connect my MARK 2 with ProGlove Insight Mobile?
- 2. Is the Bluetooth Pairing Barcode the same as on the Access Point?
- 3. Can I use ProGlove with smart glasses?
- 4. What can I do if my MARK 2 is not responding?
- 5. Some of my scanners are not charging. What can I do?
- 6. My scanner won’t charge and I’ve tried multiple chargers. How can I fix this?
- 7. What is the difference between a Hard reset and a Factory reset of the scanner?
- 8. Are there barcodes to provoke the F-Keys?
- 9. How long does the battery last in daily operations?
- 10. How can I improve the scan performance of my MARK 2?
- 11. What is the return process for defective devices?
- 12. What is an RMA?
- 13. Why can't I connect to my device using BLE HID?
- 14. How can I clean my MARK 2 scanners?
- 15. Why the choice of scanners matters?
- 16. Is my MARK 2 protected from dust and water?
- 17. Can I enable the AIM Symbology Identifier?
- 18. How can I connect my MARK 2 to an end device?
- 19. Is MARK One S / MARK 2 able to automatically change the Access Point depending on the network strength (roaming) or be connected to several Access Point?
- 20. Which types of barcodes can MARK One S / MARK 2 scan?
- 21. How do I know that I have successfully scanned and transmitted data to my MARK 2?
- 22. Can I connect MARK 2 to a Windows 10 tablet and still use advanced features like Worker Feedback?
- 23. Do you support SPP (Serial Port Profile) on Bluetooth?
- 24. Will firmware updates be forced onto our devices?
- 25. What are Firmware Over-the-Air (FOTA) updates and how long does a scanner FOTA update take?
- 26. Can I disable a specific barcode symbology to avoid reading particular barcodes, and how?
- 27. Why is the bottom of my scanner enlarged? I cannot place it in the charging station without putting slight pressure on it.
- 28. How can I enable USB POS Mode for my Gateway?
- 29. Can ProGlove scanners be connected via Wi-Fi?
1. | How do I connect my MARK 2 with ProGlove Insight Mobile? | ||||||||||||||||||
Open the app and scan the barcode to pair. The feature is called Scan2Pair. | |||||||||||||||||||
2. | Is the Bluetooth Pairing Barcode the same as on the Access Point? | ||||||||||||||||||
No, they are not the same. There is only one specific pairing barcode for Bluetooth Low Energy (BLE) that will set MARK 2 into the pairing mode, and it is the one displayed below. The LEDs will pulsate blue while MARK is searching for a host device. 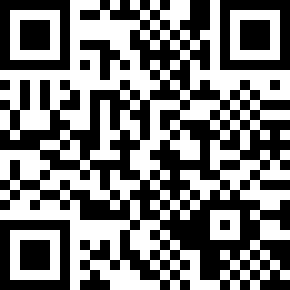 Pairing via 868/915MHz: The pairing barcode found on the top label of every Access Point is unique, and thus can only be used with that Access Point device. If your MARK 2 is unable to read the barcode or you simply want to store the Access Point in a place that is not easily accessible, you can visit pairing.proglove.de and print that same pairing barcode to hang it up somewhere more convenient. | |||||||||||||||||||
3. | Can I use ProGlove with smart glasses? | ||||||||||||||||||
In general, it is possible to pair our devices with smart glasses from specific brands. If this feature is interesting or necessary for your use case, please contact us. There are two connection options:
| |||||||||||||||||||
4. | What can I do if my MARK 2 is not responding? If the scanner is not functioning, not triggering or just not charging, you can try a few simple troubleshooting steps we listed below. If you prefer videos - don't miss our System Troubleshooting tutorial. | ||||||||||||||||||
Additionally, you test if your scanner is able to charge and/or troubleshoot it in your charging station against the ones that have no issues to compare the behavior. See next Q&A. If none of the suggestions work, please contact our Support team describe the problem, and include the scanner's serial number. We will get back to you as soon as possible. ImportantResetting your scanner to a default (factory) state will remove any current configurations settings. | |||||||||||||||||||
5. | Some of my scanners are not charging. What can I do? | ||||||||||||||||||
Test if all charging slots in your charging station are working properly. Each slot has pins that need to make contact with the back of the scanner in order for it to charge. When you put a scanner into the charger, red LEDs should light up and a pulsating light will indicate charging. If you're using MARK Display, the charging progress is shown on its display. The LEDs will turn green when the scanners are fully charged. Troubleshoot each slot in your charging station against any unresponsive scanners but also against ones where you see no issues to confirm that all slots are functioning as intended. | |||||||||||||||||||
6. | My scanner won’t charge and I’ve tried multiple chargers. How can I fix this? | ||||||||||||||||||
Our recommendation is to first review the notes and steps provided as an answer to this question. You can also perform a Hard reset, then try turning it back on and put it in the charger to see if charging succeeds. | |||||||||||||||||||
7. | What is the difference between a Hard reset and a Factory reset of the scanner? | ||||||||||||||||||
A so-called "Hard reset" of a device will reboot the device and make it restart, without removing the applied configurations and settings. Performing a Factory reset will reboot the device, but also reset it back to factory (default) settings and remove any applied configurations and settings. | |||||||||||||||||||
8. | Are there barcodes to provoke the F-Keys? | ||||||||||||||||||
Yes, we created barcodes to provoke the F-Keys. Please find the barcodes below: 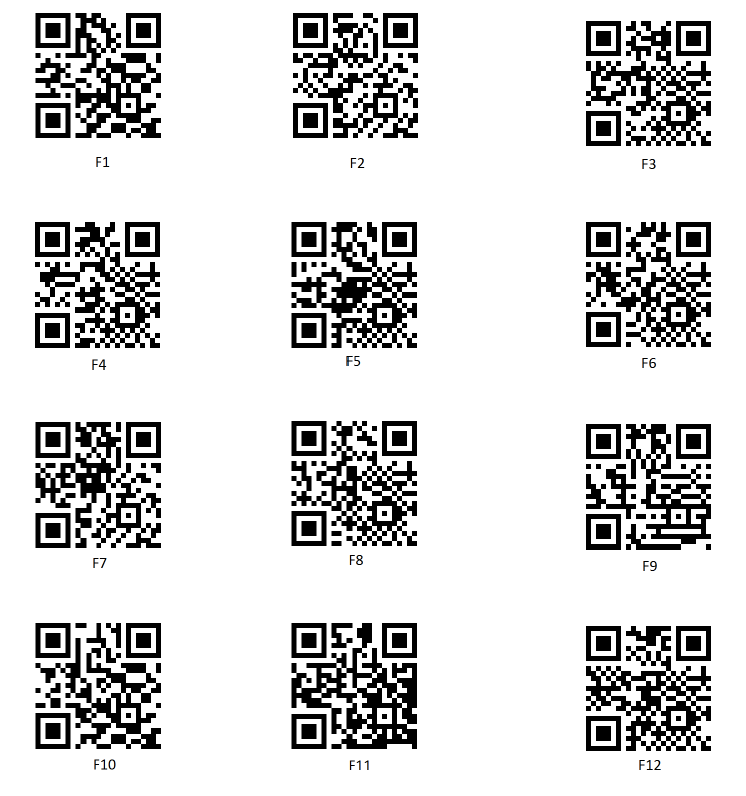 | |||||||||||||||||||
9. | How long does the battery last in daily operations? | ||||||||||||||||||
Deviations may occur due to environmental influences and depending on the application. Therefore, for a multi-shift operation (depending on the scan frequency) two scanners per workstation are sometimes necessary, which are used alternately.
| |||||||||||||||||||
10. | How can I improve the scan performance of my MARK 2? | ||||||||||||||||||
You can improve the scan performance by adjusting the Scan Engine settings in your configuration under Scanner settings on INSIGHT webportal. To learn more, see Scan performance optimization. | |||||||||||||||||||
11. | What is the return process for defective devices? | ||||||||||||||||||
If you have a defective device, try to reset the device and check out our Troubleshooting Handout. If this does not resolve your issue, you need to provide us with the serial number of the defective device and a detailed description of the issue. Please send it to us using the Support Form or via email. Our Support team will get back to you and provide an RMA as well as instructions on how to send back defective devices. How to send back devices. Print out the RMA and put it in a transport and fall-proof packaging together with the defective device. If you want to send more than one scanner you need to put the battery label on the parcel. In the instructions for the return shipment you will find a link to our DHL Tool so that you can create your own shipment label to send back the devices to ProGlove. We established this tool to provide you an easy and quick way to handle the return of your devices. This tool is very customer-friendly as you book a timeslot when the courier can pick up the parcel according to your personal availability. Due to the DIY shipment label you receive a tracking number and more transparency. Parallel to the process mentioned above, we will send you replacement devices as soon as we have the serial number and a defect description. | |||||||||||||||||||
12. | What is an RMA? | ||||||||||||||||||
RMA stands for Return Merchandise Authorization. Also known as Customer Return Notification with a unique ID that is part of the return process described in the previous question. | |||||||||||||||||||
13. | Why can't I connect to my device using BLE HID? | ||||||||||||||||||
If your MARK shows signs of searching for a device only for a few seconds and stops flashing blue, it might mean it is automatically connecting to the device that it was paired with before. If you want to use this MARK with a new device, you need to go to the Bluetooth settings of the old paired device and remove the connected scanner, just like you would remove headphones from your paired devices. Afterwards, you can scan the pairing barcode and connect to the new device from its Bluetooth settings. If the devices are being used by workers that do not have permission to access the settings INSIGHT Mobile is a great solution for Android users. If you are not an Android user, we recommend to pair one MARK with one device. Another option is using the Gateway, which provide easy pairing using its own pairing barcode. | |||||||||||||||||||
14. | How can I clean my MARK 2 scanners? | ||||||||||||||||||
Disconnect power to the charger and remove scanners from wearables before cleaning. Wait until the charger is completely dry before restoring power. It is acceptable to use disinfecting wipes with 70% isopropyl alcohol or disinfecting wipes designed for office/home use. Do not use disinfecting wipes designed for medical use, or those containing sodium hypochlorite (bleach) or abrasives. Never submerge the scanner or charger in any cleaning agents. Avoid spraying cleaners directly on the scanner window. Apply gentle pressure with a wipe or cleaning cloth to minimize the risk of changes to the cosmetic appearance or functionality. Follow the cleaning procedure from the wipe manufacturer and wipe away any residual disinfectant after the prescribed contact time. Always allow the scanner and charger to dry completely before use. Over time, the use of disinfecting wipes may impact the cosmetic appearance of your scanners and chargers. This could include (but is not limited to) discoloration, residual material build-up, and surface paint finish bubbling. | |||||||||||||||||||
15. | Why the choice of scanners matters? | ||||||||||||||||||
Workers prefer ProGlove scanners. ProGlove scanners maintain speed and accuracy while documenting every step, all handsfree, providing a safer and more ergonomic working experience for your employees. For more details from an ergonomic study conducted by the Fraunhofer Institute for Manufacturing, Engineering and Automation (IPA) about the health effects of different barcode scanners, download the infographic sheets (English version / German version) or read our blogpost. | |||||||||||||||||||
16. | Is my MARK 2 protected from dust and water? | ||||||||||||||||||
ProGlove scanners are designed for use in industrial environments. ProGlove scanners have the following IP protection classifications:
| |||||||||||||||||||
17. | Can I enable the AIM Symbology Identifier? | ||||||||||||||||||
The AIM identifier is a 3 character ISO / IEC identifier (originally created by AIM) generated by the decoder of a scanner, and gives information about the symbology of the barcode which was scanned. Format of AIM Identifier: ]cm where:
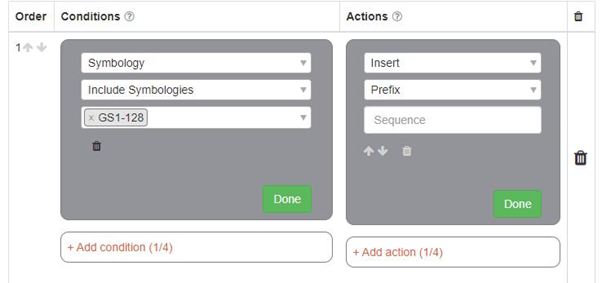
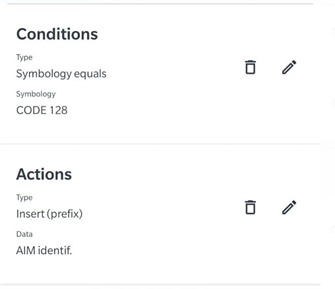
The AIM identifier is not part of a barcode. It is generated by the decoder of a scan engine to represent the barcode symbology which was scanned. We at ProGlove have no configuration barcode that enables the AIM identifier as a standard. However, there is a way to enable it if you use your Access Point or Insight Mobile. For Access Point:
For Insight Mobile:
| |||||||||||||||||||
18. | How can I connect my MARK 2 to an end device? | ||||||||||||||||||
We have two possibilities to connect MARK 2 to the end device. Connection via 868/915 MHz with Access Point. Connect the Access Point with the end device via USB HID / CDC or RS232 cable. Connection via BLE HID. MARK 2 can be used to establish a connection via Bluetooth Low Energy Human Interface Device (BLE HID) to a compatible end device running any of these operating systems: Apple iOS 11+, Google Android 4.5+ and Microsoft Windows 10. Prerequisites:
Please find detailed instructions how to connect MARK 2 via BLE HID with your end device in the User Manual or in the MARK 2 Integration Guide. Both are available in the Documents page.  | |||||||||||||||||||
19. | Is MARK One S / MARK 2 able to automatically change the Access Point depending on the network strength (roaming) or be connected to several Access Point? | ||||||||||||||||||
Automatic switching between different Access Point (Roaming) is not possible. MARK One S / MARK 2 is connected to a single Access Point by scanning the pairing barcode. However, it is possible to connect several MARK One S / MARK 2 to one Access Point. | |||||||||||||||||||
20. | Which types of barcodes can MARK One S / MARK 2 scan? | ||||||||||||||||||
For a list of barcode symbologies, see Supported barcode symbologies. | |||||||||||||||||||
21. | How do I know that I have successfully scanned and transmitted data to my MARK 2? | ||||||||||||||||||
MARK 2 Feedback for successful scan and transmission: one short beep, one green blink and short vibration. 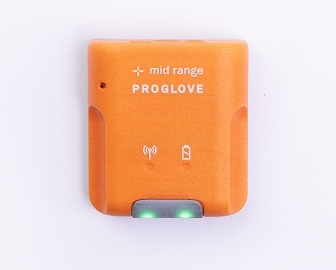 MARK 2 Feedback for successful scan but unsuccessful transmission: one short beep, one green blink and short vibration followed by two longer beeps, three red blinks and short vibration. 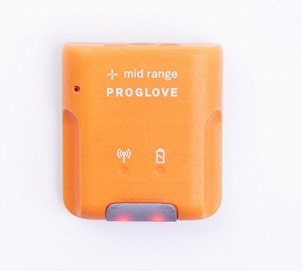 | |||||||||||||||||||
22. | Can I connect MARK 2 to a Windows 10 tablet and still use advanced features like Worker Feedback? | ||||||||||||||||||
You can connect your MARK 2 scanner to your Windows 10 tablet using the BLE HID integration. Scan the barcode below with your MARK 2 scanner to enter the pairing mode and connect it over Bluetooth to your Windows tablet. The barcode content is then typed in the open application on every scan. 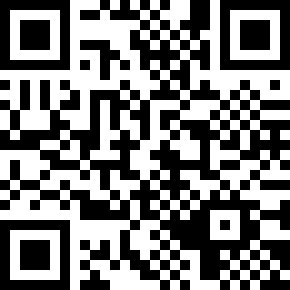 When connecting over BLE HID, you can only set one prefix/suffix to the scanned barcode content. You can also modify the Symbology Settings. However, you cannot use advanced features like Worker Feedback as this requires two-way communication with the host. For two-way communication with multiple platforms, check out our Gateway integrations. | |||||||||||||||||||
23. | Do you support SPP (Serial Port Profile) on Bluetooth? | ||||||||||||||||||
No. ProGlove scanners only use the Bluetooth Low Energy protocol and BLE does not support SPP mode. A similar integration path would be to use Android Intent API. | |||||||||||||||||||
24. | Will firmware updates be forced onto our devices? | ||||||||||||||||||
No, firmware updates are applied by you when you are ready for them. | |||||||||||||||||||
25. | What are Firmware Over-the-Air (FOTA) updates and how long does a scanner FOTA update take? | ||||||||||||||||||
FOTA updates are remote updates of scanner firmware that you enable in INSIGHT webportal by using Device Configurations. The total time for all processes to complete can differ depending on the Bluetooth Low Energy (BLE) connection speed, scanner model and current firmware. Read more here. | |||||||||||||||||||
26. | Can I disable a specific barcode symbology to avoid reading particular barcodes, and how? | ||||||||||||||||||
You can disable one or more barcode symbologies, when using both INSIGHT Mobile and Gateway, in the Symbology settings within the Config tool. | |||||||||||||||||||
27. | Why is the bottom of my scanner enlarged? I cannot place it in the charging station without putting slight pressure on it. | ||||||||||||||||||
The main cause of the problem is the natural swelling of the Lithium-Polymer batteries and insufficient space in the housing. Each battery starts to expand and deform after ~500 charging cycles. Reach out to our Support team via the Support form or email. | |||||||||||||||||||
28. | How can I enable USB POS Mode for my Gateway? | ||||||||||||||||||
Your Gateway needs to use at least Gateway firmware 2.4.0. Create a device configuration in INSIGHT for Gateway, go to Integration and enable the POS toggle. Save and apply the configuration to your devices. | |||||||||||||||||||
29. | Can ProGlove scanners be connected via Wi-Fi? | ||||||||||||||||||
ProGlove scanners use BLE (Bluetooth Low Energy) to connect to a host device, but you can configure our Gateway as a Websocket or MQTT client to communicate with a Websocket server or MQTT broker respectively over Wi-Fi. |
Need more help?
If you need additional information or help troubleshooting on a specific topic, please review the suggestions listed below for more details.
Check the section of a specific product within our documentation (i.e. Scanners, Gateway,Gateway Plus, INSIGHT Mobile (Android), INSIGHT Mobile (iOS), INSIGHT webportal, etc.) and review the FAQ page.
Try searching for a specific keyword and/or phrase to find more information or details on a specific feature or process.
Check for an FAQ paragraph within the pages/content related to a specific feature.
Review our video tutorials and try out the troubleshooting tips (found within scanner FAQ pages).
Perform a hard and/or factory reset of your devices (check question "What can I do if my MARK/LEO is not responding?" within scanner FAQs).
Try to capture (screenshot, video, device log files, etc.) the issue/behavior you are seeing.
In case you still need assistance, we welcome you to reach out to our Support team via the contact form in INSIGHT webportal or using the contact information provided below.
Phone:
EU: +49 89 26 35 00
US: +1 888 950 5304
Email:
INSIGHT webportal:
To fully understand the situation and offer the best possible solution as quickly as possible, our Support team will need serial number(s) of the device(s) you are using. In case a Gateway device is also included, follow the instructions listed here to retrieve the log files from your Gateway device and send it to our Support team along with the serial number(s) and a description of the issue.
