Introduction
Our new capabilities allow the workers to capture and send photos of any single detail, quality issue or event on the shop floor. Take a photo with your scanner to create a Photo Report, then send it directly to for further review.
Important
Ensure your are using version 2.10.0, version 1.3.0, and 1.0.2 or higher. Pair the scanners with the and connect them to a level in .
Photo Reporting via
Once your devices are paired and connected to , create a device configuration and define a Workflow Rule for your to activate capabilities on your scanner.
When you save and apply the configuration to your devices, and depending on the settings you defined, pressing the trigger on your scanner will initiate image capturing mode. Your scanner will activate the laser and its lights will flash in different colors signifying it is ready to take photos. Point the scanner's laser beam to the item or area of interest, then single-press the trigger again to capture an image.
The image is then sent via your through to , where you and your colleagues can review it. Simply repeat the steps to reactivate the feature on your scanner and take the next photo.
In case the double-press on your scanner's trigger is reserved for another action within your work process, and defined through a Workflow Rule, you can still initiate image capturing mode on your scanner by scanning the barcode displayed below.
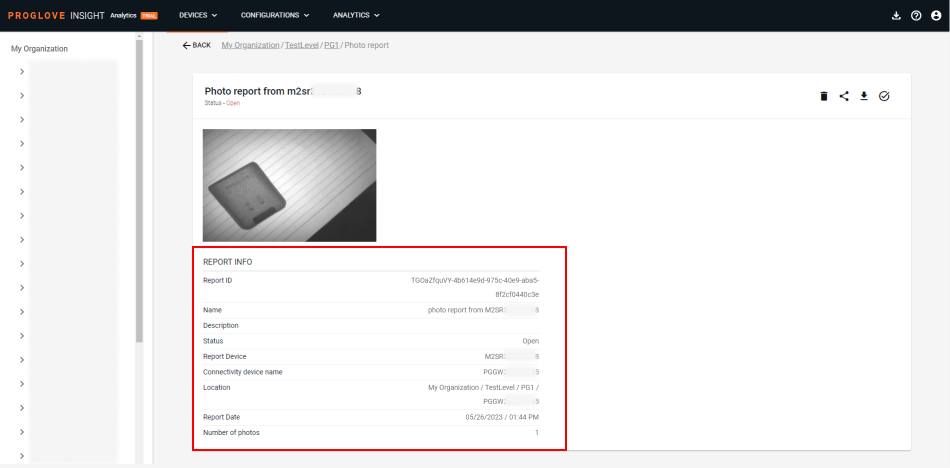
Every image sent to represents a photo report and contains a date and time stamp, as well as the details of devices used and the level within from which the report was sent. Access, review and manage any photo reports documented on your shop floor in by going to Devices, and then selecting the Photos tab. For more information on working with in , see here.
Note
It can take up to 30 seconds for a photo report to be transferred to and appear in the grid view, as shown above.
Additional information
The resolution and quality settings are currently hard-coded within the firmware settings in order to achieve the best balance between quality and responsiveness when taking or transferring an image.
Maximum message size: 128 KB
Image resolution: Full, Half or Quarter
Jpeg quality setting: value from 5 to 100 that represents the .jpeg compression level, where 5 stands for high compression (low quality and smaller size) and 100 for low compression (high quality and bigger size)
Availability and limitations:
Devices and firmware | Subscription plan | Lifecycle status | Resources |
|---|---|---|---|
, , - version 2.13.0 , - version 1.5.0 - version 1.0.2 - version 2.13.3 | , |
FAQs
- 1. Can I activate using API?
- 2. Can I use with my Android device?
- 3. Why should I use this feature?
- 4. Can I send photos directly to without an Android device?
- 5. What are the file sizes that can be sent through to ?
1. | Can I activate using API? |
Yes. You can trigger using Streams API messages. | |
2. | Can I use with my Android device? |
Yes. For more information, see via . | |
3. | Why should I use this feature? |
allows you to use the scanner that is already on the back of your hand and saves you the time and effort of handling an additional device for the purpose of capturing photos. Moreover, all photos are sent directly to your account. | |
4. | Can I send photos directly to without an Android device? |
No. An Android or devices are necessary for your scanners to connect with and send data to your account. | |
5. | What are the file sizes that can be sent through to ? |
Depending on the type of file, file sizes can vary. Below are some average sizes in KB (kilobytes).
|